Category Archives: HOME

Why wcpsvc service is running even when Supervisor cluster is not enabled on vSphere cluster?

Recently I got this question i.e. Why wcpsvc (Workload Control Plane) service is running even when Supervisor cluster is not enabled on vSphere cluster? I thought it is worth to share the answer with a quick post. Before we jump on to the list of reasons, let me share my understanding of what is the wcpsvc and what is its primary role. It is one of the services among several services running on vCenter server. It is primarily responsible for managing/orchestrating Supervisor cluster (which is key part of vSphere with Tanzu) workflows and functionality. In other words, it implements all the CRUD REST APIs for Supervisor cluster i.e. Enabling Supervisor cluster on vSphere cluster, updating Supervisor cluster to next available kubernetes version etc.

Now let us look at reasons why it should be up before enabling Supervisor cluster

  1. Since it orchestrates API for enabling Supervisor cluster, it has to be running before we call enable API.
  2. When you put host inside the cluster into maintenance mode, it has to check whether host being put into maintenance mode is part of Supervisor cluster (as one of the worker nodes). To understand what happens when we put host into maintenance mode, please have a look at my other article i.e. How to gracefully remove host from Supervisor cluster.
  3. Before enabling Supervisor cluster, there is REST API exposed by wcpsvc service to know whether given cluster is compatible or not (both Supervisor cluster with NSX-T and vSphere networking stack)
  4. If user wants to know how many distributed switches are compatible with NSX-T and in-turn wants to know whether NSX-T edge cluster is compatible with given distributed switch. There is API for the same as well.
  5. User wants to know what are the kubernetes versions supported by given vCenter server before enabling it.
  6. User wants to get an idea on sizing for the Supervisor cluster i.e. TINY, SMALL, MEDIUM, LARGE and network CIDR default sizes.
  7. H5C has some vSphere with Tanzu UI workflows and for it to dynamically showcase them, it has to make some API calls exposed by wcpsvc irrespective of whether Supervisor cluster is enabled or not

I hope you now got insight into why wcpsvc has to be running without even Supervisor cluster is not up. It might happen there are few more reasons wcpsvc has to be running, I will update this post as I understand more.

Further reading

1. Official documentation for vSphere with Tanzu is here
2. Automating supervisor cluster workflows using Java
3. Automation around Supervisor cluster

Automating key vSphere Supervisor cluster operations using Java SDK

Recently I got an opportunity to work as technical reviewer of the programming guide wrt vSphere with Kubernetes Configuration and Management (pdf here). As part of that, I had contributed few key Java API samples around vSphere Supervisor cluster into open source vSphere Automation Java SDK. I thought it is good to brief you about the same and also share key getting started tips around vSphere Automation Java SDK. If you are new to vSphere with Tanzu (aka vSphere with K8s) capability, I suggest you to go through below articles.

1. Introduction to vSphere Supervisor Cluster REST APIs
2. Python scripts to configure Supervisor cluster & create namespaces

Basically there are 4 Java API samples. If you are just looking for samples, just refer below links.

  1. Enable Supervisor cluster,
  2. Create Supervisor namespace and
  3. upgrading Supervisor cluster to next available kubernetes version.
  4. Disabling Supervisor cluster

Getting started tips : Enabling Supervisor Cluster with vSphere Automation java SDK

  1. It is assumed that you already have a base environment with NSX-T stack as specified here . Note that there is vSphere with Tanzu through vSphere network stack introduced with vSphere 70U1 as well. It is just that the sample I had contributed around enabling workload management feature (i.e. Configuring your vSphere cluster as Supervisor cluster) is applicable to NSX-T stack. I will contribute vSphere network stack based sample as well.
  2. Before you start, please understand this general REST API doc around Supervisor cluster enable operation. I love using this brand new developer portal. As a beginner, I would just spend around few minutes. It is fine if you did not understand few things, just move on.
  3. Now it is time to build your vSphere automation Java SDK environment in Eclipse. Steps for building it are explained here
  4. Once your eclipse environment is ready and added all samples into your eclipse project, you would also get all Supervisor cluster related samples I contributed into your eclipse project under “namespace_management” package. You can optionally spend few minutes, its fine if you could not, lets move on.
  5. In order to automate anything using vSphere automation Java SDK , it is important that you understand Java specific vSphere Automation doc. Note that this doc is different from the one mentioned in step 2 above. Again just spend few minutes understanding how it is organized and move on. As you spend more time, you will be comfortable referring it.
  6. Once you got fair idea around java specific doc as mentioned in step 5, now you can start looking at Java specific API doc for enabling workload platform i.e. Enabling vSphere cluster as Supervisor cluster. This is the doc I used to write this sample, just spend 1-2 min on this and move on.
  7. While you are going through doc in step 6, start co-relating it in parallel with actual java code sample around the same. Co-relating with doc and code will make your understanding better.
  8. Please closely look at what params are passed and EnableSpec is built.

Creating Supervisor namespace

  1. Most of the steps mentioned above applies here also. You can simply move to next step and take a look at this sample directly.
  2. This is the sample you need to understand for creating Supervisor namespace. Good thing is that same sample applies to creating namespace with either NSX-T or vSphere networking stack. With vSphere networking stack, there is one new param introduced i.e. networks on which you want to create this Supervisor namespace. Here is the Java Specific documentation around this API

Upgrading Supervisor cluster to next available kubernetes version.

  1. Upgrading Supervisor cluster deserves one separate post, which I will do as I get time but meanwhile you can learn more about it here
  2. Java sample for the same is here.
  3. Good thing is that same sample applies to upgrading Supervisor cluster with either NSX-T or vSphere networking stack.
  4. Note that we have REST API for upgrading multiple clusters in single API call as well. Refer doc here (upgradeMultiple method)

Disabling Supervisor cluster.

  1. Disabling supervisor cluster does lot more than usual disabling as it removes/deletes vSphere pods, Guest clusters/TKG also. Basically it makes cluster in a state that was just before enabling it. Hence be careful before calling this API.
  2. Java sample for the same is here
  3. Good thing is that same sample applies to disabling/removing Supervisor cluster with either NSX-T or vSphere networking stack.

This is all I have in this post. I hope it was useful post. If Java SDK is not your thing, you can simply automate Supervisor cluster ops using either python as I did or use official vSphere Automation python SDK or go for DCLI also. In addition, it is important to note that VMware has decided to deprecate vSphere Automation .NET and Perl SDK (VMware KB) to more focus on Java, python and Go SDKs.

How to gracefully remove host from NSX-T based Supervisor Cluster?

Recently got this question couple of times on how to gracefully remove host from existing Supervisor cluster, which is configured with NSX-T. I thought it is worth to write a quick post with detailed steps. Removal of the host from existing Supervisor cluster can be for multiple reasons, it can be for some maintenance or adding host into other supervisor cluster etc.

If you are still not aware of what is this Supervisor cluster, I would highly recommend you read this blog post.

Below steps are written assuming you have NSX-T based Supervisor cluster configured. In NSX-T based supervisor cluster, ESXi hosts are also working as kubernetes worker nodes, hence it is important they are properly removed from cluster. In new 70 U1 capability vSphere with Tanzu with vSphere (VDS) networking, ESXi hosts are no more worker nodes as there it is all about Tanzu kubernetes clusters (aka Guest clusters), hence removing host from VDS based Supervisor cluster is same as earlier.

Steps :

  1. Identify the host you would like to remove.
  2. Put the host in maintenance mode
  3. Since host is now going into maintenance mode, all the vSphere pods running on this node/host will be re-created on the other available hosts (DRS will take care of recommending proper host).
  4. VMs running on this host such as Supervisor control plane VMs or Guest Cluster VMs or any other normal VMs will be migrated to other available hosts as usual.
  5. Once host goes into maintenance mode, spherelet service on the host will be stopped but spherelet vib pushed to ESXi host will be still there. you can check spherelet vib and service status using below commands. SSH to host for running below commands.
  6. “esxcli software vib list | grep spherelet” & “/etc/init.d/spherelet status”
  7. When host goes into maintenance mode, in kubernetes term, it is called node is drained. i.e. this host is no more ready for taking any k8s workloads. When you run “kubectl get nodes”, it should be shown as “not ready”.
  8. NSX-T host transport node will be still as it is in configured state. You can confirm it from NSX-T UI or you can also check “nsx” vibs on host in maintenance mode.
  9. Now instead of removing this directly from inventory, move this host as standalone host into datacenter.
  10. As soon as you move this host as standalone host, spherelet vib on the host will be removed as well i.e. no spherelet service will be on it as well.
  11. Also, NSX-T host transport node will be un-configured as well automatically. i.e. All NSX-T vibs are removed at this stage. You can check it from NSX-T UI, it should be shown as “Not Configured”. This happens because while configuring NSX-T, we had applied host transport node profile on vSphere cluster level.
  12. “kubectl get nodes” or H5C UI (Cluster >> Monitor >> Namespaces >> Overview) should not show this host as worker node.
  13. Only reference now pending is, this host is still part of Distributed switch (DVS/VDS) you configured as part of Supervisor Cluster. You can remove it from usual DVS UI workflow.
  14. At this stage, this host is completely free to go for maintenance or add into another Supervisor cluster. You can remove it now from vCenter server inventory as needed.
  15. To add host back into same Supervisor cluster again, it is better to have host in maintenance mode, make sure you add this host back to DVS/VDS configured. Move this host into cluster, exit from maintenance mode and it will automatically install spherelet and NSX-T vibs and after few min, it will be ready for taking k8s workloads.

Further reading:
1. vSphere with Kubernetes (now vSphere with Tanzu) 101 is here
2. Official documentation for vSphere with Kubernetes is here
3. Automation around Supervisor cluster
4. Read about new 70 U1 capability vSphere with Tanzu with vSphere (VDS) networking
5. Automating supervisor cluster workflows using Java

Script to Configure vSphere Supervisor Cluster using REST APIs

Last week I introduced you to vSphere Supervisor cluster APIs and also had a post on how to use DCLI for managing vSphere Supervisor cluster. In this post, I am going to show you how to enable/configure vSphere Supervisor cluster and also create namespace on the top of vSphere Supervisor cluster.
These key APIs are demonstrated using couple of python scripts. This time I thought let me try little different style of writing. I am sure you will enjoy learning.

1. Enable/configure vSphere Supervisor cluster :

What/Where/HowLink/Info
Where to refer REST
API documentation?
Official API documentation
or H5C –> Developer Center –> API Explorer
How do I land from VCF 4.0 on to vSphere for configuring this key workflow? Refer this cool short video
VCF 4.0 SDDC manager by Cormac
How do I create base setup for
labs, learning purpose?
Refer this cool deployment script
by William
My python script to configure Supervisor cluster on base setup configure_supervisor_cluster.py script.
Used python library “requests” to call APIs. We can use other “vSphere Automation SDKs” as well

or

Automating supervisor cluster workflows using Java SDK
Enable vSphere Supervisor cluster API POST https://{server}/api/vcenter/namespace-management/clusters/{cluster} ?action=enable
Complete API Spec/payload for above POST call API Spec
Enable API Spec/Payload I passed in my scriptGithub link for spec
you can use the same for postman call
How did I fetched inputs needed to be passed into POST Call? Refer line 139 through 178 in script
Sample runShown below
How it looks in UI before & after ?Shown below

How to run script :
C:\vThinkBeyondVM\vcpy>python configure_supervisor_cluster.py -s “10.x.x.x” -u “Administrator@vsphere.local” -cl “WCP-cluster-1” -mnw “VM Network” -sip “10.x.x.x” -sm “255.255.x.x” -gw “10.x.x.x” -dns “10.x.x.x” -ntp “10.x.x.x” -sp “k8s-gc-policy” -egress “10.x.x.x” -ingress “10.x.x.x”

Password will be asked on CLI. You might wonder, am I not passing VDS and Edge cluster? please refer the line 161 through 170. REST APIs allowed me to use some trick.

Which UI workflow is automated?
This python script automates below UI worklow, where user will configure workload network, management network, storage etc.


How it looks from UI
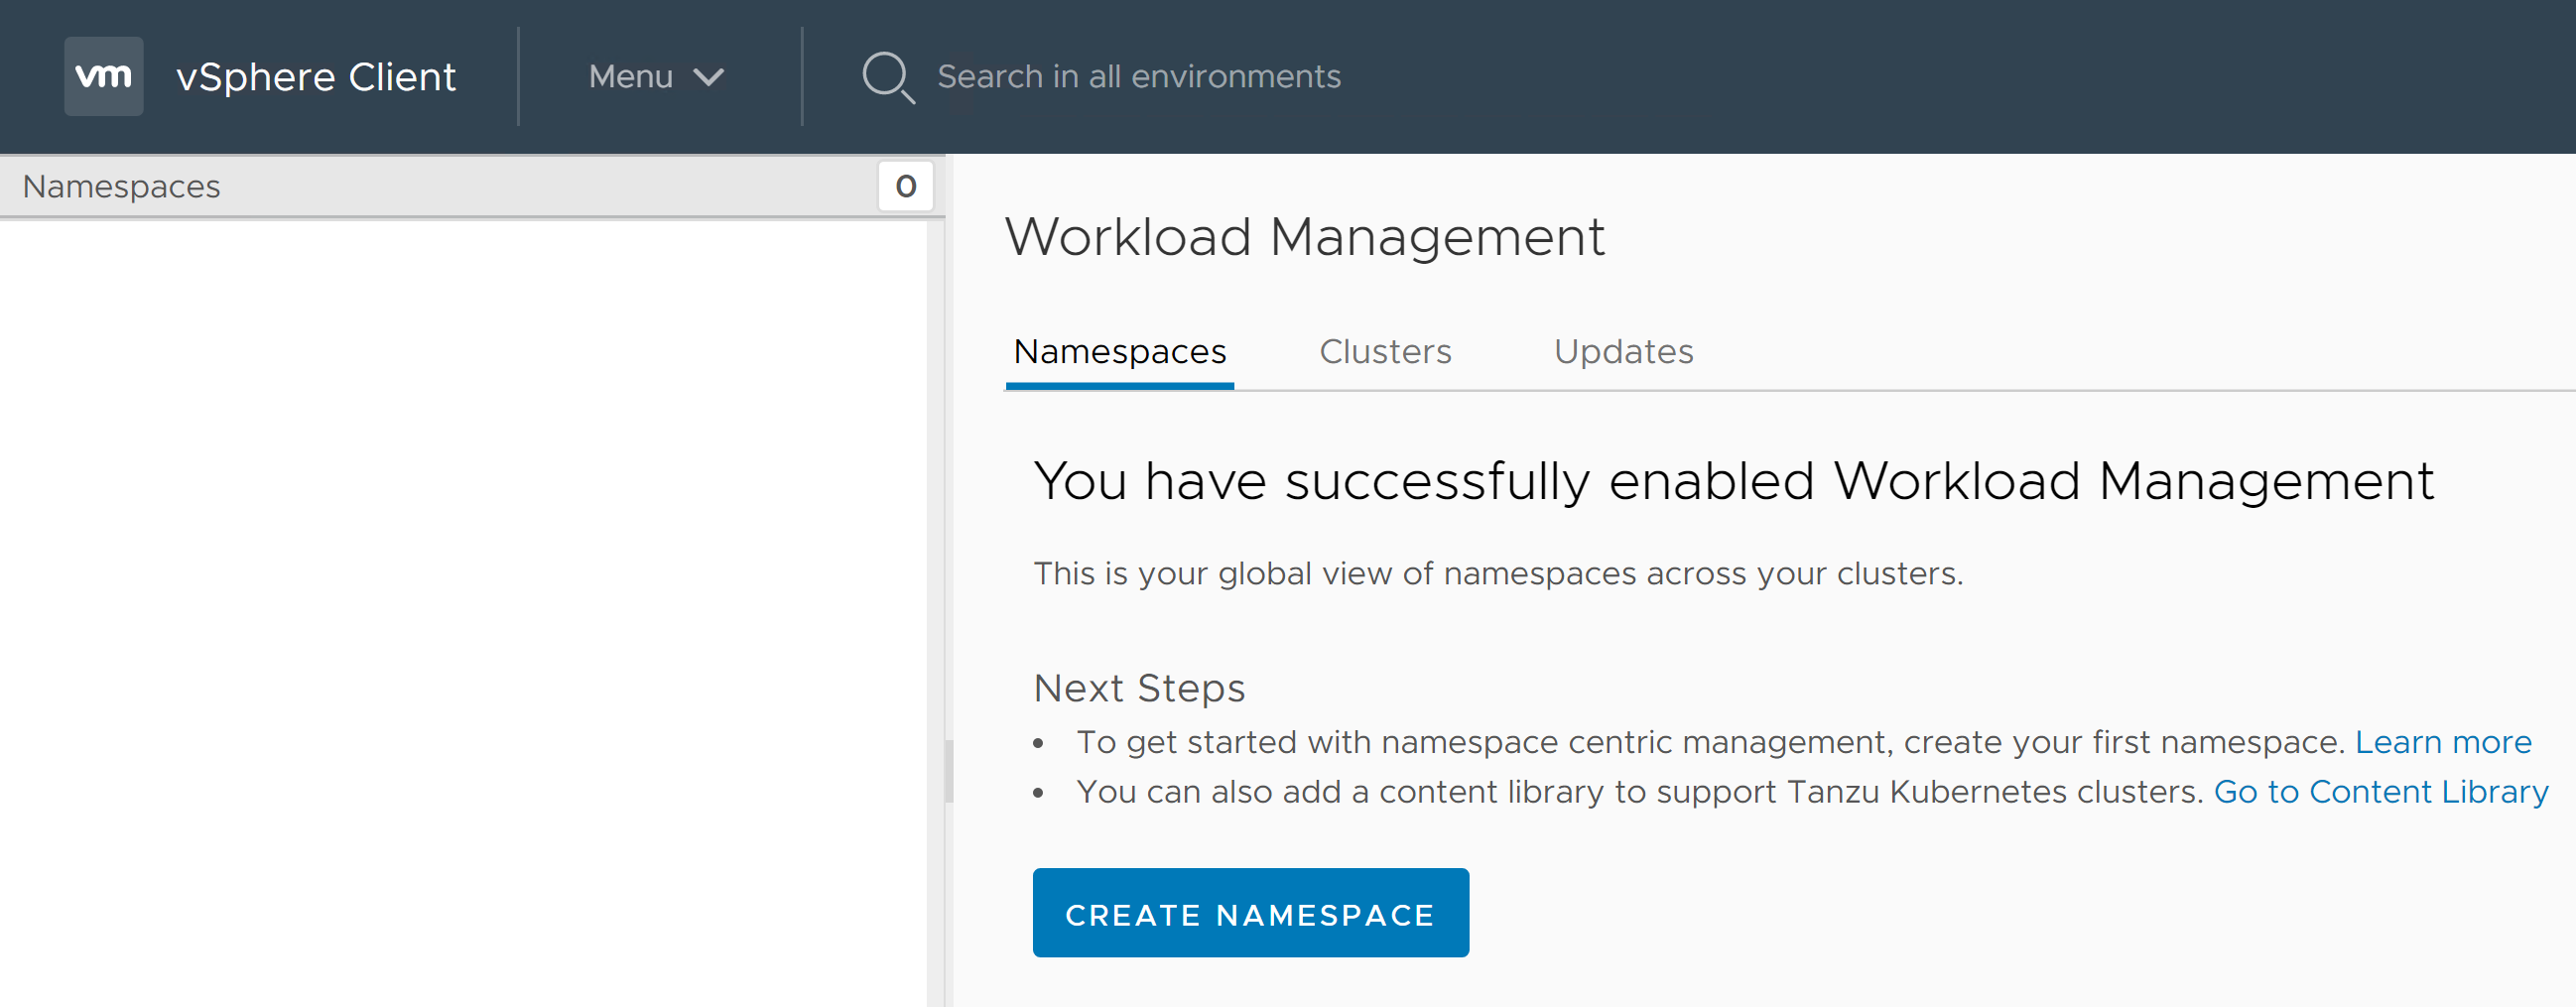
once Super visor cluster is enabled, this is how it looks (H5C > Menu > Workload Management)

2. Creating your first namespace using script

Create namespace URL POST https://{server}/api/vcenter/namespaces/instances
API payload/specpayload
Python scriptcreate_namespace.py
How to runShown below
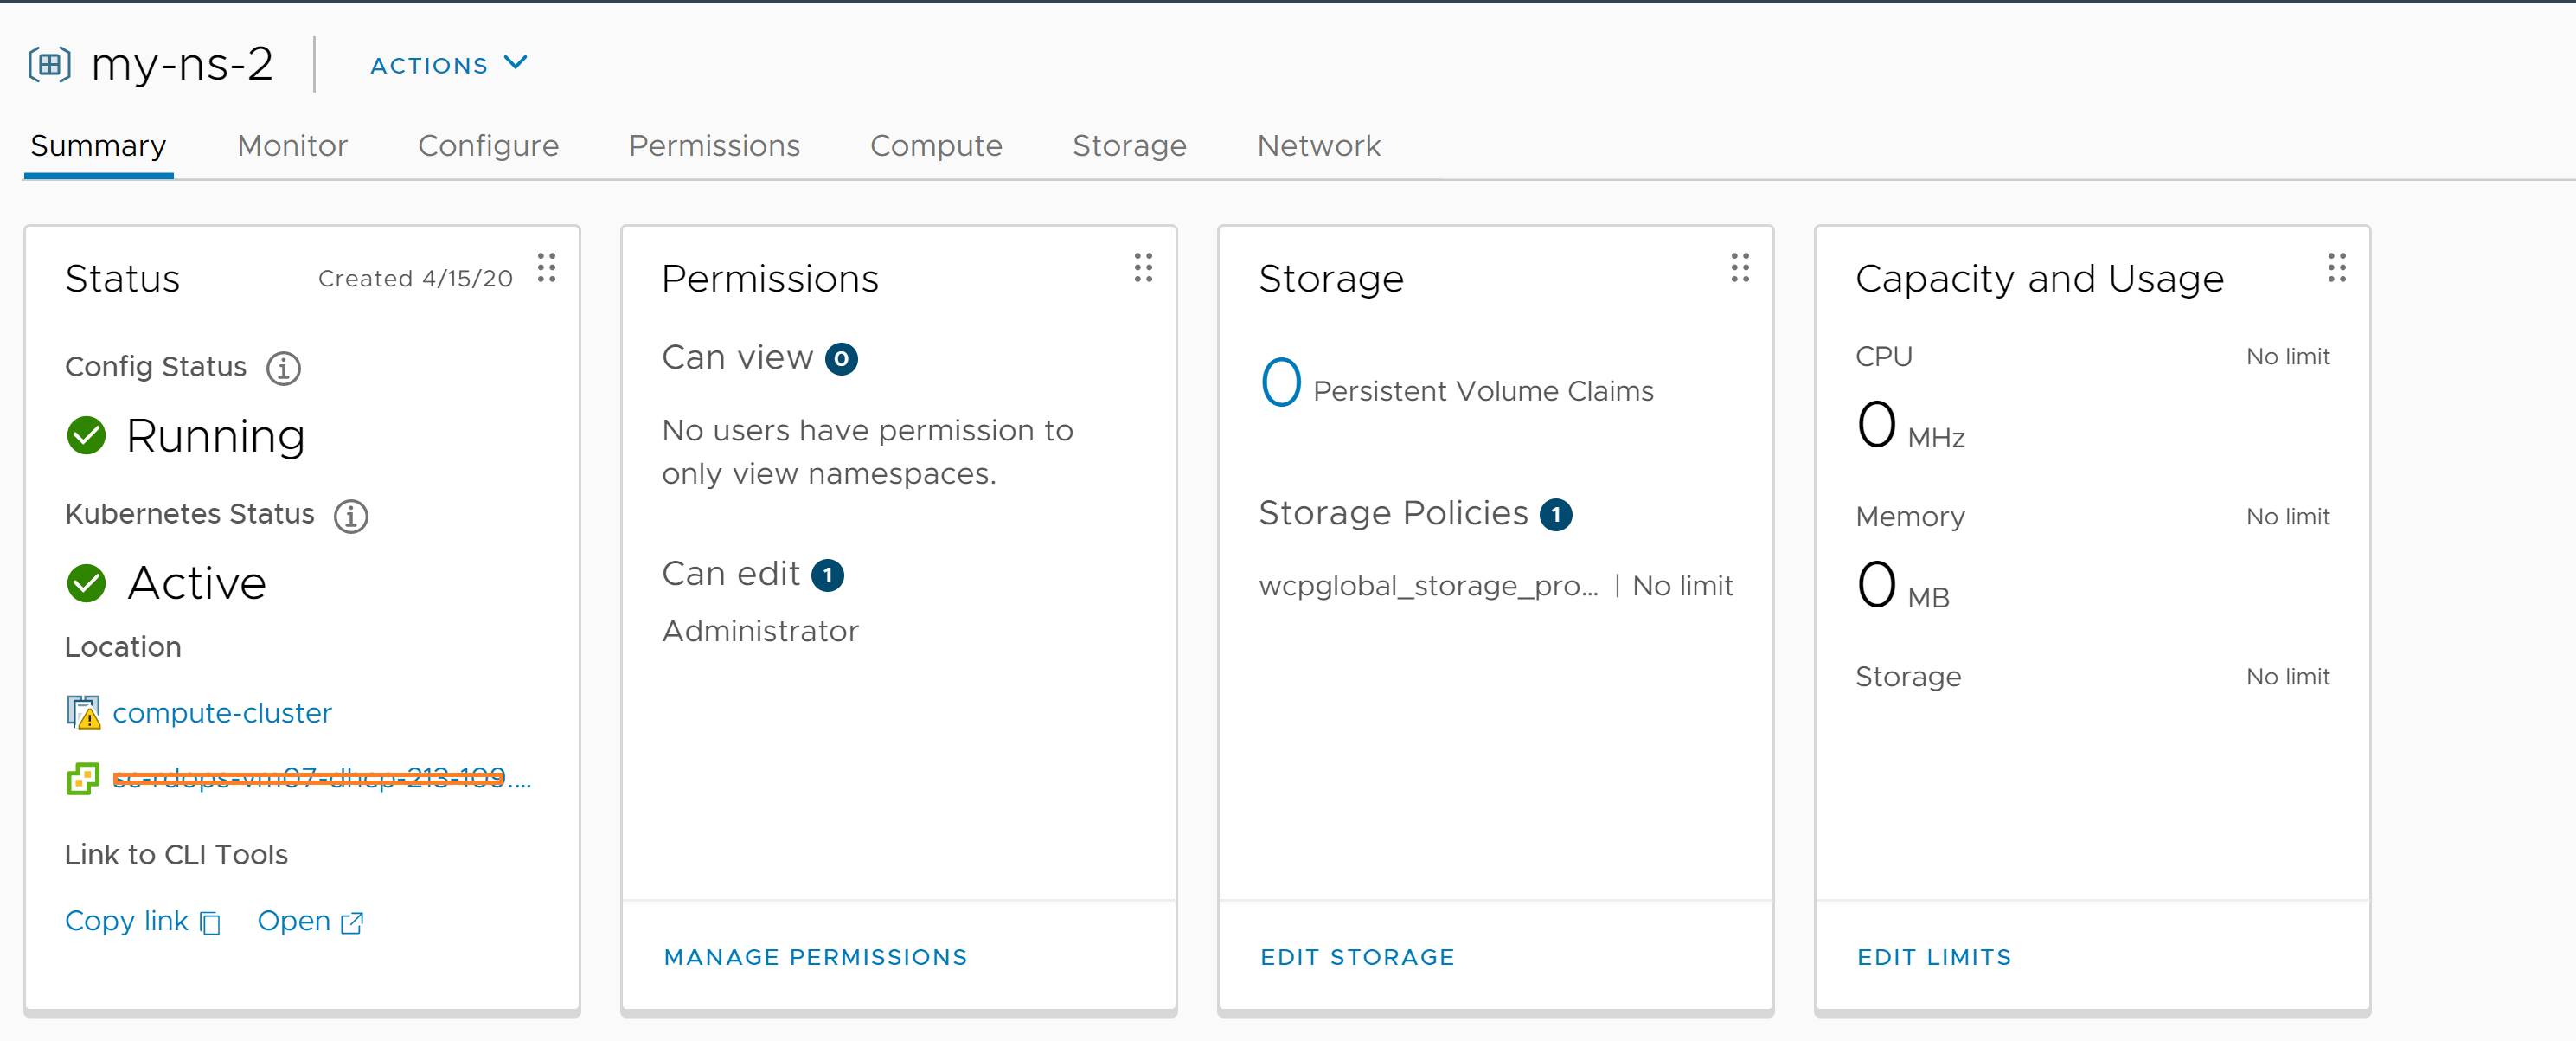
How it looks from UIShown below

How to run script:
C:\vThinkBeyondVM\vcpy>python create_namespace.py -s 10.x.x.x -u Administrator@vsphere.local -cl WCP-cluster-1 -role EDIT -st USER -subject Administrator -domain vsphere.local -sp k8s-gc-policy -ns my-ns-2

How it looks from UI ?

I hope you enjoyed learning. Please stay tuned for upcoming posts around vSphere with K8s and other vSphere 7.0 functionality. Let me know if you have any queries, feedback.

Further reading:
1. REST API documentation
2. How to get vSphere with Kubernetes?
3. Introduction to manage vSphere Supervisor Cluster using API
4. Automating supervisor cluster workflows using Java SDK
5. vSphere with Kubernetes 101 is here
6. Official documentation for vSphere with Kubernetes is here

vMotion and Clone using REST APIs with vSphere 7.0

Couple of weeks back vSphere 7.0 released & if you ask me, it is a massive release with several cool features and capabilities including “vSphere with Kubernetes”. I was going through all the REST APIs introduced as part of multiple features shipped in this release and I see that this is the first release, where REST APIs are hands down dominating traditional SOAP based APIs. New capabilities have not only been exposed through REST APIs but also some of the older capabilities have provided REST API support as well. In this series of posts, I would like to introduce you these REST APIs as I did for vSphere Supervisor Cluster last week. In this post, I will touch upon new APIs introduced as part of “Virtual Machine” Management & demonstrate them using Postman client and Python.

Where do I get REST API documentation? This is available as part of H5C API Explorer itself since vSphere 6.5: H5C >> Menu >> Developer center >> API explorer or you can look documentation at VMware {code} site as well.

Since vSphere 6.5, when it comes to REST APIs with respect to VM life cycle, only minimal support was available i.e. Get, Create (POST call) and Delete VMs. With vSphere 7.0, I see there is huge progress made with respect to supporting key capabilities such as relocate, normal clone, instant clone & register VMs operations. Traditionally automating these VM life cycle ops have been challenging for several users using SOAP APIs, now with REST API support, it has drastically simpler to consume/automate these capabilities. Below is how its POST call URLs look like

Relocate ops:
POST https://{server}/rest/vcenter/vm/{vm}?action=relocate
POST https://{server}/rest/vcenter/vm/{vm}?vmw-task=true&action=relocate

Only difference between them is that 2nd API also returns task object, which will help user track the progress of the operation.

Clone ops:
POST https://{server}/rest/vcenter/vm?action=clone
POST https://{server}/rest/vcenter/vm?vmw-task=true&action=clone

Similar to relocate API, second API returns task object.

Instant clone ops:
POST https://{server}/rest/vcenter/vm?action=instant-clone

Register ops
POST https://{server}/rest/vcenter/vm?action=register
POST https://{server}/rest/vcenter/vm/{vm}?action=unregister


Note that there is no change to existing SOAP APIs for all the existing capabilities, it should continue to work fine without any impact

Let us now understand one of the APIs in more detail. Without a doubt, it should be all time famous capability i.e. vMotion (relocate).

POST https://{server}/rest/vcenter/vm/{vm}?action=relocate

Below is how payload for this API look like

{
    "spec" : {
        "disks" : [
            {
                "value" : {
                    "datastore" : "datastore_moid"
                },
                "key" : "disk key"
            }
        ],
        "placement" : {
            "cluster" : "cluster_moid",
            "folder" : "folder_moid",
            "datastore" : "datastore_moid",
            "host" : "host_moid",
            "resource_pool" : "resourcepool_moid"
        }
    }
}


let us understand each of the parameter being passed in brief. For detailed documentation, please refer official documentation from API Explorer or from vmware {code} portal.

disks []: This spec has 2 values such as datastore and key as follows, it is required field to pass details for all the VM disks.

datastore : required: This parameter under “disks[]” should be the destination datastore for the VM disks. This should be datastore_moid and moid found using existing REST API:
GET https://{server}/rest/vcenter/datastore
sample value : “datastore-21”

key: required: this must be the disk key(s) for the VM to be migrated and it can be found using existing REST API. sample value : “2000”
GET https://{server}/rest/vcenter/vm/{vm}/hardware/disk

placement : destination spec

cluster: this should be cluster moid. This can be specified if we would like DRS to find the right host for placement. This can be optional param. moid can be found using API: sample value : “domain-c9”
GET https://{server}/rest/vcenter/cluster

folder: destination VM folder. This is optional param. moid can be found using API. sample value : “group-v4”
GET https://{server}/rest/vcenter/folder

datastore: This is under placement_spec: This is required if you want relocate VM configuration folders/files to destination. The “datastore” property briefed before above is for VM disks.

host: destination host. It is optional if cluster or resource pool is passed. sample value : “host-32”
moid can be found using API: GET https://{server}/rest/vcenter/host

resource_pool: destination resource pool. This is not required if host or cluster is specified. sample value : “resgroup-34”
moid can be found using API: GET https://{server}/rest/vcenter/resource-pool

Note that there are couple of noteworthy points wrt relocate and clone REST APIs. As of vSphere 7.0, it does not give an option to specify destination network & it does not support cross vCenter migration/clone as well . I hope in future releases, both of these key aspects will be supported through REST APIs

Let us invoke this API. I did it using both postman REST client and Python.

Postman way:

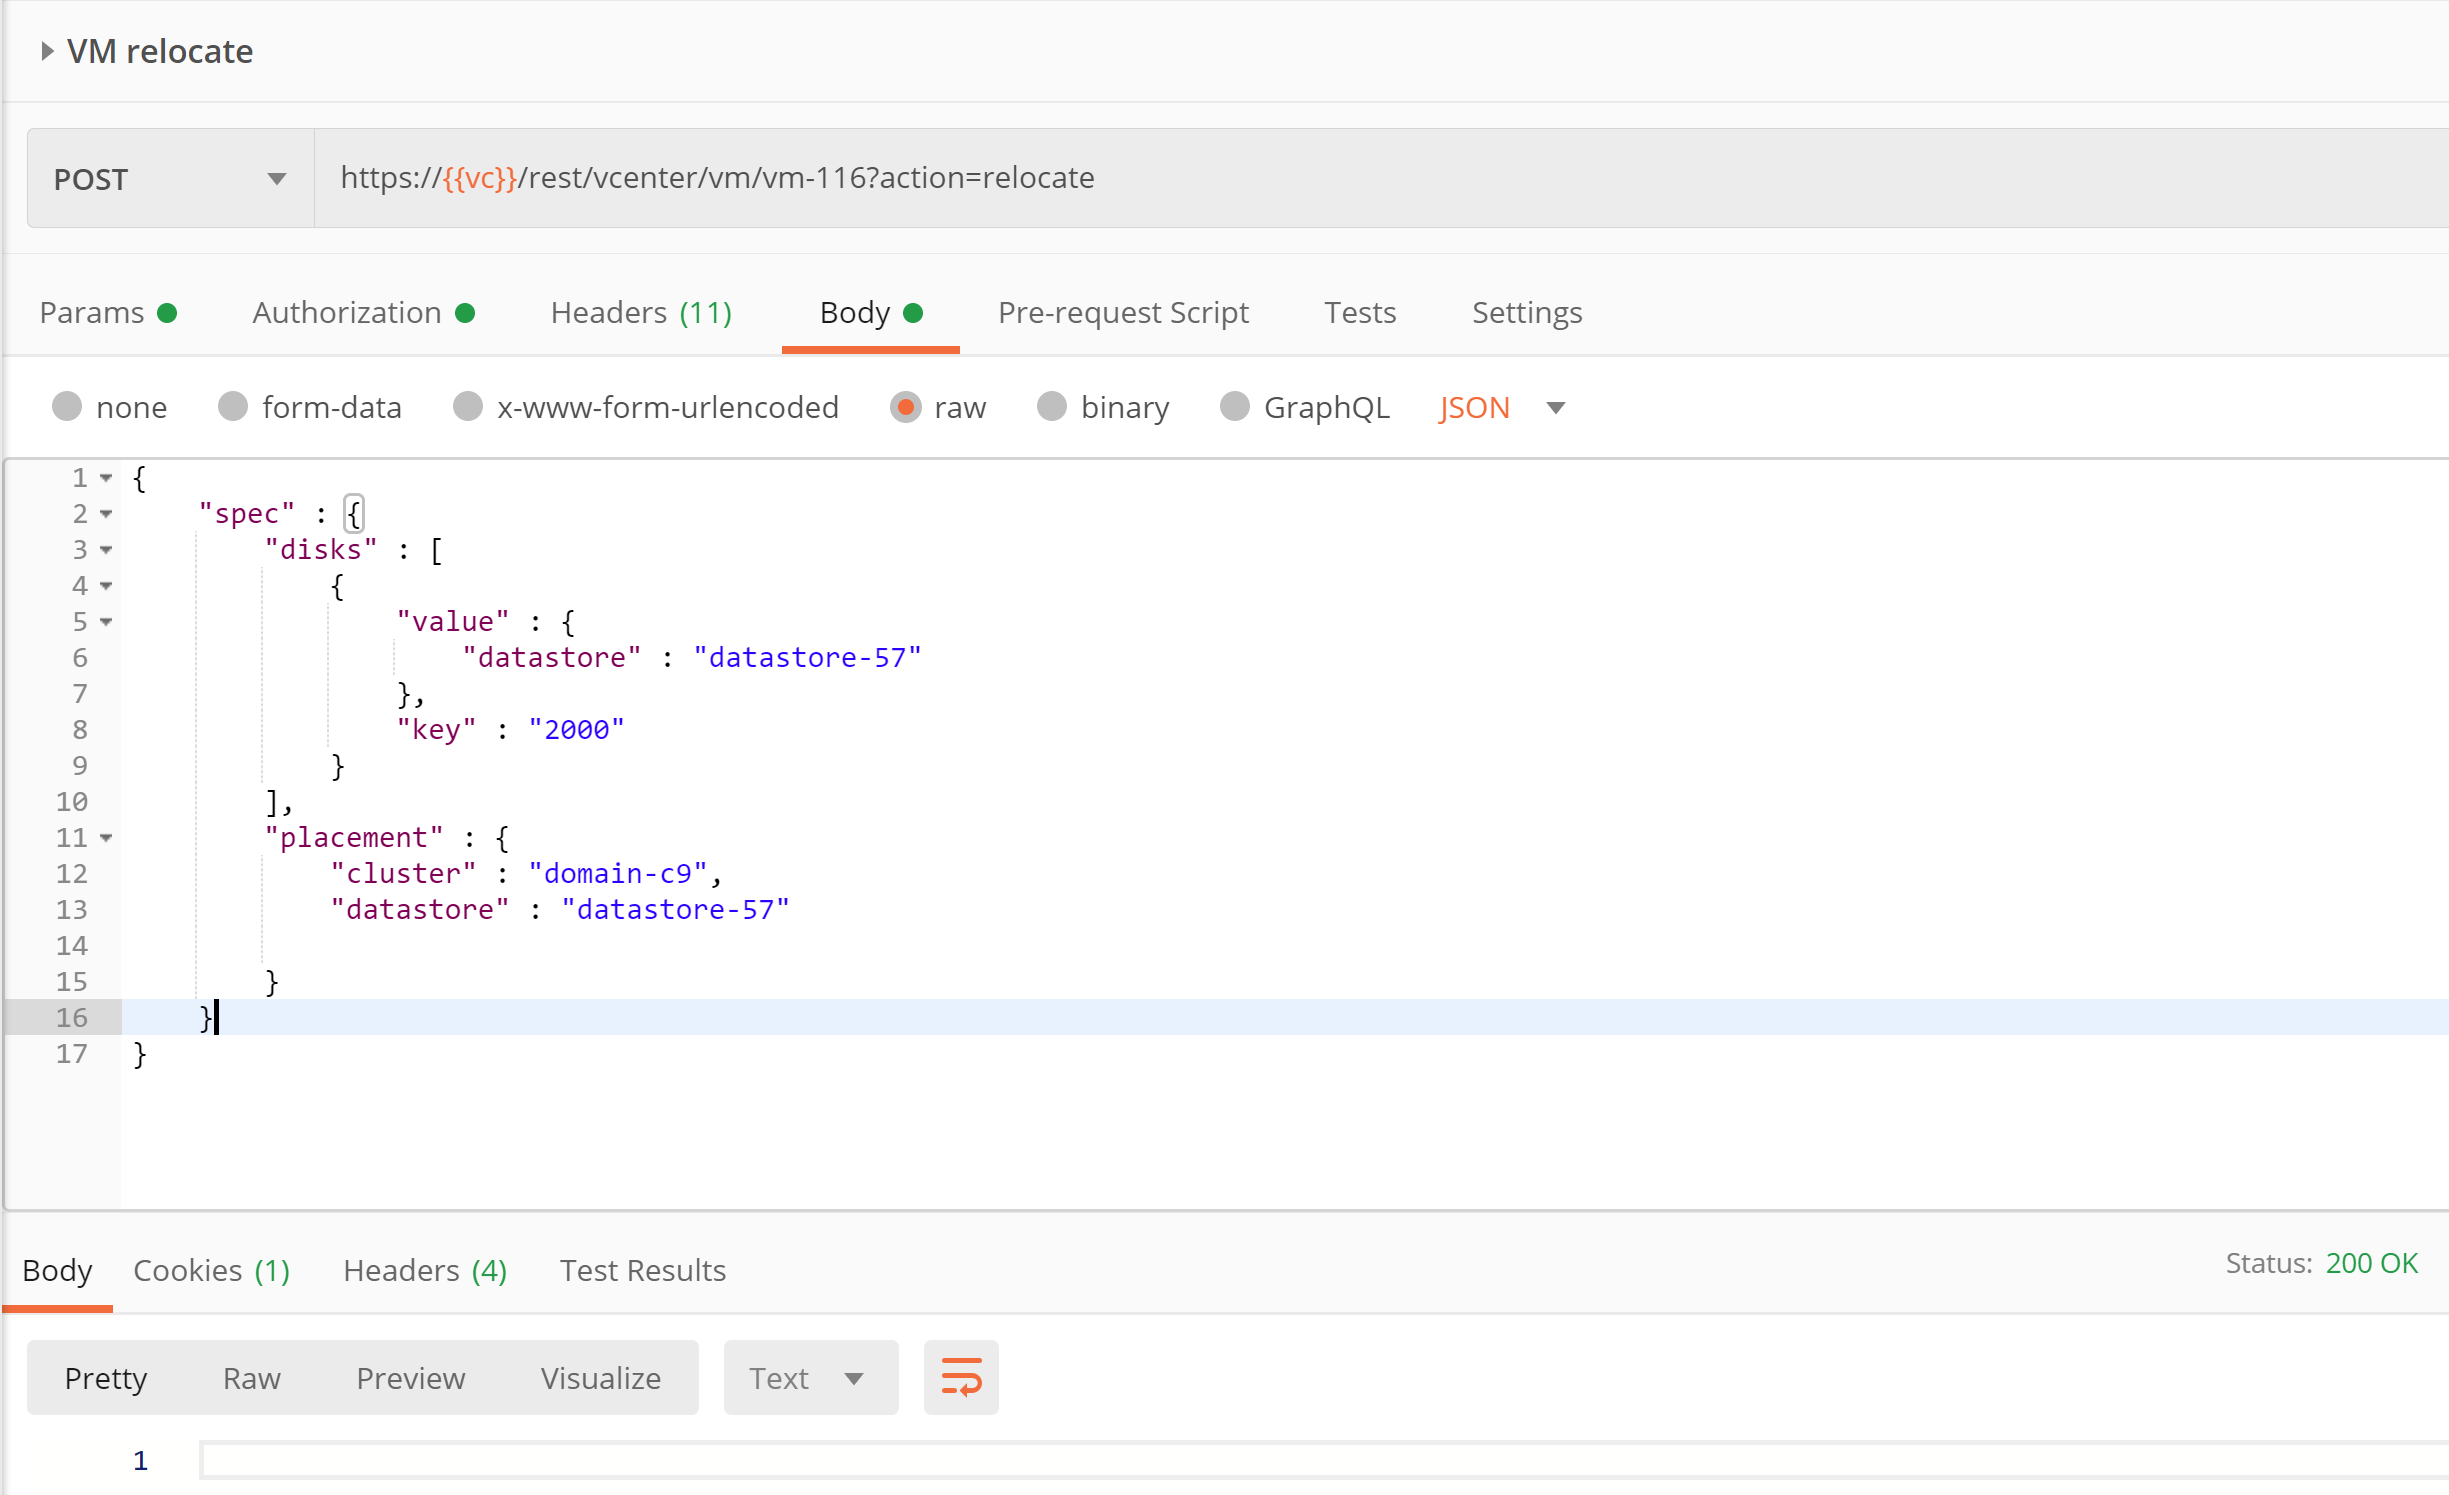
Note: In my case, I am relocating the VM from one cluster to other DRS enabled cluster. If you do not have DRS enabled cluster, you can go with passing destination host instead. I passed just enough params as shown below in Postman client but you may pass as per your requirement.

Here is the payload passed for easy copy paste.

{
    “spec” : {
        “disks” : [
            {
                “value” : {
                    “datastore” : “datastore-57”
                },
                “key” : “2000”
            }
        ],
        “placement” : {
            “cluster” : “domain-c9”,
            “datastore” : “datastore-57”
        }
    }
}

Python way:

Here is the equivalent python script for the same on my github repo. Below is how you would execute this python script


You can see API returned 200 ok response. how cool is that!

I hope you enjoyed this post. Please stay tuned for next post in this REST API series.

References:
– How to get started guide on REST APIs using Postman and python
– Introduction to vSphere Supervisor cluster APIs