In part 1, we explored new vCenter HA APIs for managing vCenter HA. In part 2, we will focus on how to deploy vCenter HA using pyVmomi. As I pointed in part-1, managed object FailoverClusterConfigurator is responsible for deploying vCenter HA & below are the methods exposed by this managed object.
- deployVcha_Task
- configureVcha_Task
- createPassiveNode_Task
- createWitnessNode_Task
- destroyVcha_Task
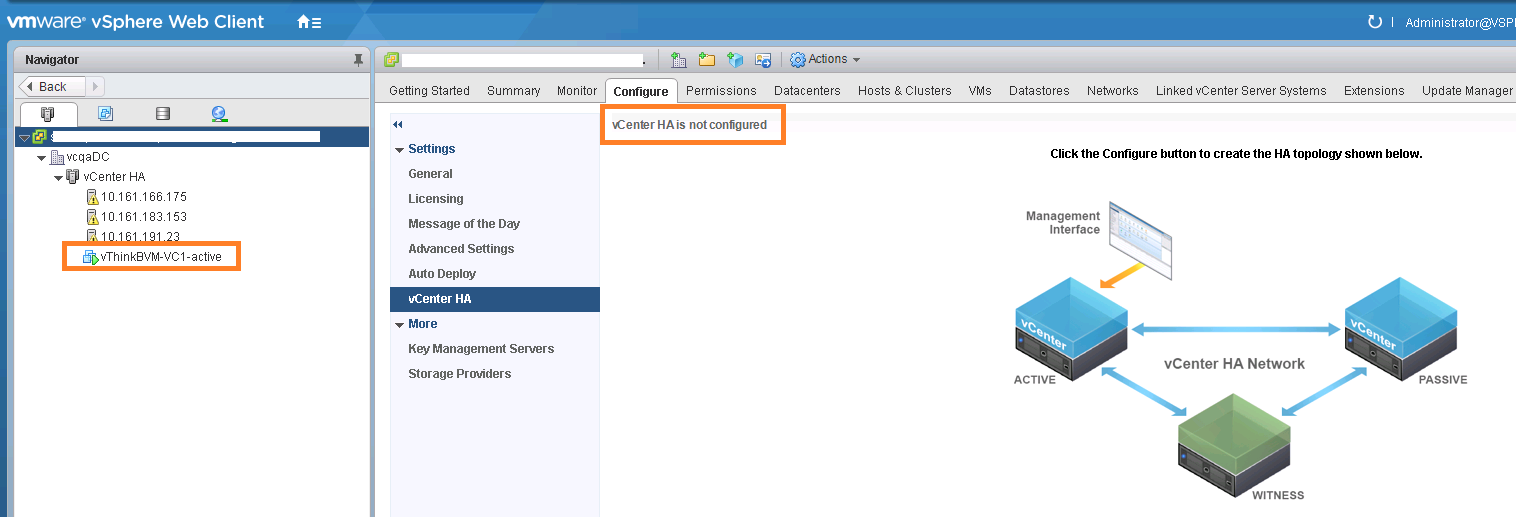
Let us start with first and important method i.e. deployVcha_Task() : This method is really handy when user wants to deploy as well as configure vCenter HA in single call. I will encourage you to read vSphere API reference for more details on this method. This method assumes that you already deployed vCenter server,which would act as active node and created required vCenter HA network. As I wanted to deploy vCenter HA in basic mode, I created my self managed vCenter server as shown below & configured required vCenter HA network.
Before you start deploying your active node, please take a look at vCenter HA software & hardware requirement. I would also recommend you to just overview this & this documentation. If you need any help on deploying active node, please let me know, I would be happy to help you.
Lets take a look at code now. Note that detailed code documentation is added inside script itself for your easy reference & all below scripts are available on my github repo as well.
[python]
from pyVim.connect import SmartConnect
from pyVmomi import vim
import ssl
# Deploying vCenter HA in basic mode using self managed VC
s=ssl.SSLContext(ssl.PROTOCOL_TLSv1)
s.verify_mode=ssl.CERT_NONE
si= SmartConnect(host="10.161.34.35", user="Administrator@vsphere.local", pwd="VMware#23",sslContext=s)
content=si.content
#Parameters required are hardcoded below, please do change as per your environment.
vcha_network_name="VCHA" #port group name, I am using standard switch.
vcha_dc_name="IndiaDC" #Datacenter name
vcha_subnet_mask="255.255.255.0" #Subnect mask for vCenter HA/Private network
active_vcha_ip="192.168.0.1" # Active node vCenter HA IP
passive_vcha_ip="192.168.0.2" # Passive node vCenter HA IP
witness_vcha_ip="192.168.0.3" # Witness node vCenter HA IP
active_vcha_vm_name="vThinkBVM-VC1" #Active node/VC VM name
active_vc_username="Administrator@vsphere.local" #Active VC username
active_vc_password="VMware#23" #Active VC password
active_vc_url="https://10.61.34.35" #Active VC public IP
active_vc_thumbprint="55:A9:C5:7E:0C:CD:46:26:D3:5C:C2:92:B7:0F:A7:91:E5:CD:0D:5D" #Active VC thumbprint
passive_vc_datastore="SharedVMFS-1" #Passive node datastore
witness_vc_datastore="SharedVMFS-2" #Witness node datastore
vcha=si.content.failoverClusterConfigurator #Getting managed object responsible for vCenter HA deployment
# Below method helps us to get MOR of the object (vim type) that we passed.
def get_obj(content, vimtype, name):
obj = None
container = content.viewManager.CreateContainerView(content.rootFolder, vimtype, True)
for c in container.view:
if name:
if c.name == name:
obj = c
break
else:
obj = None
return obj
vcha_network=get_obj(content,[vim.Network],vcha_network_name)
vcha_dc=get_obj(content,[vim.Datacenter],vcha_dc_name)
#I would highly recommend to read vSphere API reference for "failoverClusterConfigurator", this will help to understand below specs.
deployment_spec=vim.vcha.FailoverClusterConfigurator.VchaClusterDeploymentSpec()
#Active node related data/parameter population
active_nw_config_spec=vim.vcha.FailoverClusterConfigurator.ClusterNetworkConfigSpec()
active_nw_config_spec.networkPortGroup=vcha_network
active_ipSettings=vim.vm.customization.IPSettings()
active_ipSettings.subnetMask = vcha_subnet_mask
active_ip_spec=vim.vm.customization.FixedIp()
active_ip_spec.ipAddress= active_vcha_ip
active_ipSettings.ip=active_ip_spec
active_nw_config_spec.ipSettings=active_ipSettings
deployment_spec.activeVcNetworkConfig=active_nw_config_spec
#Active node service locator
active_vc_spec=vim.vcha.FailoverClusterConfigurator.SourceNodeSpec()
active_vc_vm=get_obj(content,[vim.VirtualMachine],active_vcha_vm_name)
active_vc_spec.activeVc=active_vc_vm
service_locator=vim.ServiceLocator()
cred=vim.ServiceLocator.NamePassword()
cred.username=active_vc_username
cred.password=active_vc_password
service_locator.credential=cred
service_locator.instanceUuid=si.content.about.instanceUuid
service_locator.url=active_vc_url #Source active VC
service_locator.sslThumbprint=active_vc_thumprint
active_vc_spec.managementVc=service_locator
deployment_spec.activeVcSpec=active_vc_spec
#Passive node configuration spec
passive_vc_spec=vim.vcha.FailoverClusterConfigurator.PassiveNodeDeploymentSpec()
passive_ipSettings=vim.vm.customization.IPSettings()
passive_ipSettings.subnetMask = vcha_subnet_mask
passive_ip_spec=vim.vm.customization.FixedIp()
passive_ip_spec.ipAddress= passive_vcha_ip
passive_ipSettings.ip=passive_ip_spec
passive_vc_spec.ipSettings=passive_ipSettings
passive_vc_spec.folder=vcha_dc.vmFolder
passive_vc_spec.nodeName= active_vcha_vm_name+"-passive"
passive_datastore=get_obj(content,[vim.Datastore],passive_vc_datastore)
passive_vc_spec.datastore=passive_datastore
deployment_spec.passiveDeploymentSpec=passive_vc_spec
#Witness node configuration spec
witness_vc_spec=vim.vcha.FailoverClusterConfigurator.NodeDeploymentSpec()
witness_ipSettings=vim.vm.customization.IPSettings()
witness_ipSettings.subnetMask = vcha_subnet_mask
witness_ip_spec=vim.vm.customization.FixedIp()
witness_ip_spec.ipAddress= witness_vcha_ip
witness_ipSettings.ip=witness_ip_spec
witness_vc_spec.ipSettings=witness_ipSettings
witness_vc_spec.folder=vcha_dc.vmFolder
witness_vc_spec.nodeName=active_vcha_vm_name+"-witness"
witness_datastore=get_obj(content,[vim.Datastore],witness_vc_datastore)
witness_vc_spec.datastore=witness_datastore
deployment_spec.witnessDeploymentSpec=witness_vc_spec
# Calling the method we aimed to invoke by passing complete deployment spec
task= vcha.deployVcha_Task(deployment_spec)
if(task.info.state == "running"):
print "VCHA deployment is started, it will take few minutes, please monitor web client for its completion"
[/python]
As soon as we invoke deployVcha_Task() method, it deploys vCenter HA in basic mode where it also creates passive and witness node. Below is how it looks when looked into web client recent task pane.
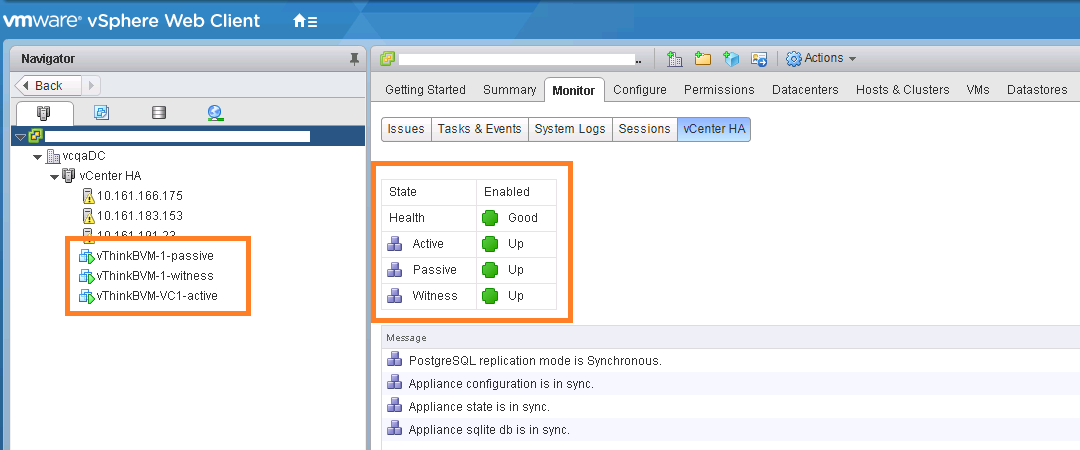
We can see that “Deploy VCHA” task is running, it has in-turn cloned passive/witness nodes and initiated powereON operations. I waited for some time for deploy VCHA task to get completed. After completion, below is how vCenter HA VMs look from web client.
Note: You might have noticed that we need to have vCenter active node thumbprint to be passed in VCHA spec. I could get this thumbprint by using openssl command as shown here. In fact, there are some other ways to get it as well.
Now that we deployed VCHA successfully, let us take a look at how to destroy the vCenter HA using method “destroyVcha_Task()”: This method can be invoked when VCHA is disabled, isolated or its configuration is failed. In my case, I chose to disable the existing VCHA by using method “setClusterMode_Task()” , which we already explored in Part-I. Lets take a look at the code.
[python]
from pyVim.connect import SmartConnect
from pyVmomi import vim
import ssl
#Destroy vCenter server HA
s=ssl.SSLContext(ssl.PROTOCOL_TLSv1)
s.verify_mode=ssl.CERT_NONE
si= SmartConnect(host="10.161.34.35", user="Administrator@vsphere.local", pwd="VMware#23",sslContext=s)
content=si.content
#Getting VCHA configurator managed object
vcha=si.content.failoverClusterConfigurator
#Getting VCHA cluster manager
vcha_cluster_manager=si.content.failoverClusterManager
# Setting vCenter HA to "disabled" mode.
task = vcha_cluster_manager.setClusterMode_Task("disabled")
while(task.info.state != "success"):
continue
#Getting VCHA cluster mode
VCHA_mode=vcha_cluster_manager.getClusterMode()
if (VCHA_mode == "disabled"):
vcha.destroyVcha_Task() #Destroing it
else:
print "VCHA must be in disabled mode before destrying it"
[/python]
When I executed above script, I could see from web client that vCenter HA mode got set to disabled followed by vCenter HA was getting destroyed. Please take a look at below screenshot to confirm it

I waited for few seconds & I could see, vCenter HA is destroyed as shown in below screenshot.

Note that once we destroy VCHA using above method, active node will continue to work fine & serve client requests. This API just destroys the VCHA configuration. It does not delete passive & witness node by itself. To delete passive & witness node, you will have to use regular VM destroy API (This option is provided in UI as part of vcenter HA destroy UI workflow)
Moving on to other methods exposed by managed object “FailoverClusterConfigurator”, it seems these methods (listed below) are directly suited when VCHA is deployed using advanced option
configureVcha_Task(),
createPassiveNode_Task(),
createWitnessNode_Task()
Since I had deployed vCenter HA using basic option, I will talk about above methods in my future post or will add samples on my github repo. On the other side, you can refer all the scripts discussed in part-1,2 & easily code around those as well. If you ask me, it would be really good exercise to understand vCenter HA APIs.
Notes:
1. All above scripts are available on my github repository as well. Even, I have a plan to write one nice python module for the same.
2. Note that, for the sake of simplicity, I have hard-coded some values & disabled certificate validation, hence please do appropriate changes as per your environment.
2. I highly recommend you to read Part 1
3. Finally, if you haven’t yet set up “pyVmomi” environment, refer my blog post

Vikas Shitole is a Staff engineer 2 at VMware (by Broadcom) India R&D. He currently contributes to core VMware products such as vSphere, VMware Private AI foundation and partly VCF . He is an AI and Kubernetes enthusiast. He is passionate about helping VMware customers & enjoys exploring automation opportunities around core VMware technologies. He has been a vExpert since last 11 years (2014-24) in row for his significant contributions to the VMware communities. He is author of 2 VMware flings & holds multiple technology certifications. He is one of the lead contributors to VMware API Sample Exchange with more than 35000+ downloads for his API scripts. He has been speaker at International conferences such as VMworld Europe, USA, Singapore & was designated VMworld 2018 blogger as well. He was the lead technical reviewer of the two books “vSphere design” and “VMware virtual SAN essentials” by packt publishing.
In addition, he is passionate cricketer, enjoys bicycle riding, learning about fitness/nutrition and one day aspire to be an Ironman 70.3


I was trying to configure VCHA advanced mode by using below methods:
configureVcha_Task(),
createPassiveNode_Task(),
createWitnessNode_Task()
But it seems createPassive and witness node methods is only for maintenance and not for deployment. These methods work only on degraded but already configured VCHA cluster.
My work has been blocked. Please let me know if are able to crack this.