All posts by Vikas Shitole

About Vikas Shitole

Vikas Shitole is a Senior Tech Lead at VMware by Broadcom, VCF division, India, where he leads system test efforts—including scale, stress, and resiliency testing—and drives product quality across VMware Cloud Foundation (VCF), Broadcom’s flagship private cloud platform. He is an AI and Kubernetes enthusiast, and is passionate about VMware customers and automation around vSphere and VCF. Vikas has been honoured as a vExpert for 13 consecutive years (2014–2026) for his sustained technical contributions and community leadership. He is the author of two VMware Flings, holds multiple industry certifications including VCF admin 9.0, and is one of the top contributors to the VMware API Sample Exchange, where his automation scripts have been downloaded over 50,000 times. Vikas has shared his expertise as a speaker at international conferences such as VMworld Europe and VMworld USA, and was selected as an official VMworld 2018 blogger. He also served as lead technical reviewer for the Packt-published books vSphere Design and VMware Virtual SAN Essentials. Beyond tech, Vikas is a dedicated cricketer, cycling enthusiast, and a lifelong learner in fitness and nutrition, with the personal goal of completing an Ironman 70.3

Tutorial: Part-2 : How to Manage EVC using vSphere Python SDK pyVmomi?

In part-1, we explored EVC enable, disable APIs & some important EVC properties using pyVmomi. In part-2, we would explore left out EVC APIs from part-1 i.e.CheckConfigureEvcMode_Task() & CheckAddHostEvc_Task(). In addition, we will also take a look at some more important EVC properties required to manage EVC end to end.

1. Checking whether EVC can be configured on existing cluster or not?
CheckConfigureEvcMode_Task() is responsible for checking exactly the same. If you have existing cluster with several hosts and if you would like to evaluate whether EVC can be enabled on cluster or not on particular EVCMode key, this API is really handy. If it is not possible to enable EVC on particular cluster, this API will return not only the set of reasons why it can fail to configure EVC but also the set of hosts those are causing it to fail. Before we start, below are the set of hosts present in cluster already.

vmware@localhost:~$ python getMaxEVCModeonHost.py
ClusterName::vThinkBVMCluster
10.160.20.30::intel-broadwell
10.160.20.31::intel-sandybridge
vmware@localhost:~$

To start with, the way we did in part-1, we will check whether EVC can be enabled on “intel-broadwell” EVCMode key. As we learned in last post, EVC should not be able to configure on this cluster with EVCMode “intel-broadwell”. Let us see whether API properly returns right reason and host that is causing it.

Below script is available on my git-hub repo as well

[python]
from pyVim.connect import SmartConnect, Disconnect
from pyVmomi import vim
import atexit
import ssl
import sys
import time

#Script to check whether EVC can be enabled on cluster with given EVCMode

s=ssl.SSLContext(ssl.PROTOCOL_TLSv1)
s.verify_mode=ssl.CERT_NONE
si= SmartConnect(host="10.160.50.60", user="Administrator@vsphere.local", pwd="VMware#12",sslContext=s)
content=si.content
cluster_name="vThinkBVMCluster";

# Below method helps us to get MOR of the object (vim type) that we passed.
def get_obj(content, vimtype, name):
obj = None
container = content.viewManager.CreateContainerView(content.rootFolder, vimtype, True)
for c in container.view:
if name:
if c.name == name:
obj = c
break
else:
obj = None
return obj

#Cluster object
cluster = get_obj(content,[vim.ClusterComputeResource],cluster_name)
evc_cluster_manager=cluster.EvcManager()

print "ClusterName::"+cluster.name

task=evc_cluster_manager.CheckConfigureEvcMode_Task("intel-broadwell")
time.sleep(5)
checkResult= task.info.result

if(checkResult):
print "EVC can not be enabled on this cluster, please take look at below reasons and hosts causing this issue"
for result in checkResult:
print result.error.msg
for h in result.host:
print h.name
print "———————"
else:
print "EVC can be successfully enabled on the cluster with no issues"

atexit.register(Disconnect, si)

[/python]

vmware@localhost:~$ python checkEVC.py
ClusterName::vThinkBVMCluster
EVC can not be enabled on this cluster, please take look at below reasons and hosts causing this issue
The host’s CPU hardware does not support the cluster’s current Enhanced vMotion Compatibility mode. The host CPU lacks features required by that mode.
10.160.20.31
———————

isn’t this error matching with this screenshot from Part-1?

Note: If you notice on line #38, CheckConfigureEvcMode_Task() API returns ClusterEVCManagerCheckResult only when EVC can NOT be configured on the cluster.

Now I did powerON one of the VMs on host, which has max EVCMode as “intel-broadwell” and executed above script but this time passed EVCMode key as “intel-sandybridge”. Let us take a look at output.

Output:
vmware@localhost:~$ python checkEVC.py
ClusterName::vThinkBVMCluster
EVC can not be enabled on this cluster, please take look at below reasons and hosts causing this issue
The host cannot be admitted to the cluster’s current Enhanced vMotion Compatibility mode. Powered-on or suspended virtual machines on the host may be using CPU features hidden by that mode.
10.160.20.30
———————
vmware@localhost:~$

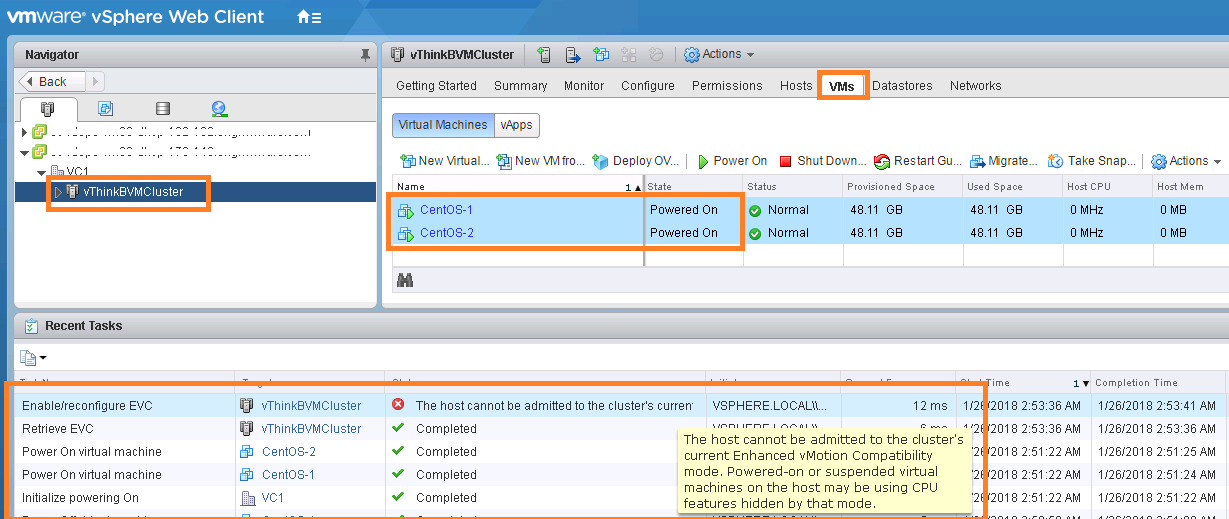
You can see, EVC configuration failed since one of VM was powered ON, which is using some cpu features those are NOT available on “intel-sandybridge” EVC mode. This is expected and error is exactly matching with web client screenshot from Part-1.

Now I powered-off the VM residing on “intel-broadwell” based host & Powered-ON VM on host, which support max EVCMOde as “intel-sandybridge”. Finally executed same checkEVC.py script and below is the output.

Output:
vmware@localhost:~$ python checkEVC.py
ClusterName::vThinkBVMCluster
EVC can be succesfully enabled on the cluster with no issues
vmware@localhost:~$

wasn’t output cool? Note that VM was up on host with “intel-sandybridge” host and EVCMode used was also “intel-sandybridge”, hence EVC will be configured successfully. Now let us move on to next EVC API.

2. Checking whether host can be added into existing EVC enabled cluster or not?
CheckAddHostEvc_Task() API allows user to check exactly the same. This API accepts HostSpec as paramter for the host to be checked and below is the code snippet. I will leave it to you in order to try this API in your environment.

[python]
host_conn_spec=vim.host.ConnectSpec()
host_conn_spec.force=True
host_conn_spec.hostName=host.name
host_conn_spec.userName=host_user
host_conn_spec.password=host_pass
thumb_print=host.summary.config.sslThumbprint
host_conn_spec.sslThumbprint=thumb_print
print host_conn_spec
task=evc_cluster_manager.CheckAddHostEvc_Task(host_conn_spec)
[/python]

That is all about EVC APIs. I hope Part-1 & Part-2 have given you good insight into how to play around EVC APIs. Stay tuned for my next post. Please comment if you have any query.

Tutorial: How to manage Enhanced vMotion Compatibility (EVC) using vSphere Python SDK pyVmomi? Part-I

As part of recent security issues i.e. Spectre & Meltdown, I got an opportunity to play around  one of famous vSphere features i.e. Enhanced vMotion Compatibility (EVC) and  I thought this is the right time to explore EVC vSphere APIs . I see that EVC APIs are made public as part of vSphere 6.0 release though feature itself was introduced in vSphere 4.0. Since there is lot to learn about EVC vSphere APIs, I thought it is better to divide this topic in 2 parts. These parts will be kind of tutorial on EVC APIs and at the same time, we will touch upon EVC functionality as well. Before we start exploring EVC APIs, it is important that you understand what EVC is all about & why one needs to enable it on cluster? For quick learning, I think, no better resource than this EVC FAQ KB. In short, EVC makes it possible to mix different generations of CPU servers inside a cluster, which enables vMotion across these servers. Once EVC is enabled on vSphere cluster level, it ensures that all the servers across different CPU generation exposes same cpuid bits to its virtual machines.

When it comes to EVC APIs, ClusterEVCManager is the major managed object, which exposes 4 important methods as follows.

  •  ConfigureEvcMode_Task()
  •  DisableEvcMode_Task()
  • CheckConfigureEvcMode_Task()
  • CheckAddHostEvc_Task()

1. Getting max EVCMode key

Before we look into above methods, we need to get max EVCMode supported by each ESXi host to be added into EVC enabled cluster. Let us take a look at simple pyVmomi script for the same.

Below script is available on my github repo getMaxEVCMode.py
[python]
#Script to get Max EVC Mode supported on all the hosts in the cluster

from pyVim.connect import SmartConnect, Disconnect
from pyVmomi import vim
import atexit
import ssl
import sys

s=ssl.SSLContext(ssl.PROTOCOL_TLSv1)
s.verify_mode=ssl.CERT_NONE
si= SmartConnect(host="10.160.50.60", user="Administrator@vsphere.local", pwd="VMware#12",sslContext=s)
content=si.content

# Your cluster name
cluster_name="vThinkBVMCluster"

# Below method helps us to get MOR of the object (vim type) that we passed.
def get_obj(content, vimtype, name):
obj = None
container = content.viewManager.CreateContainerView(content.rootFolder, vimtype, True)
for c in container.view:
if name:
if c.name == name:
obj = c
break
else:
obj = None
return obj

#Cluster object
cluster = get_obj(content,[vim.ClusterComputeResource],cluster_name)
print "ClusterName::"+cluster.name

# Get all the hosts available inside cluster
hosts = cluster.host

#Iterate through each host to get MaxEVC mode supported on the host
for host in hosts:

host_max_evcmode = host.summary.maxEVCModeKey

if host_max_evcmode == None:
print host.name+" does not support EVC"
else:
print host.name+"::"+host_max_evcmode

#Disconnect the vCenter server session.
atexit.register(Disconnect, si)
[/python]

Above script takes cluster name as input, get all the hosts inside the cluster and iterate through each host in order to get max EVCMode required to enable the EVC on right mode. Line #37 is what gets us “maxEVCModeKey”. Let us take look at how output looks like

Output :
vmware@localhost:~$ python getMaxEVCModeonHost.py
ClusterName::vThinkBVMCluster
10.160.20.30::intel-broadwell
10.160.20.31::intel-sandybridge
vmware@localhost:~$

You could see, there are 2 hosts inside the cluster and their max EVCMode keys are intel-broadwell and intel-sandybridge respectively. We need to choose right max EVCMode key to enable EVC on the cluster.

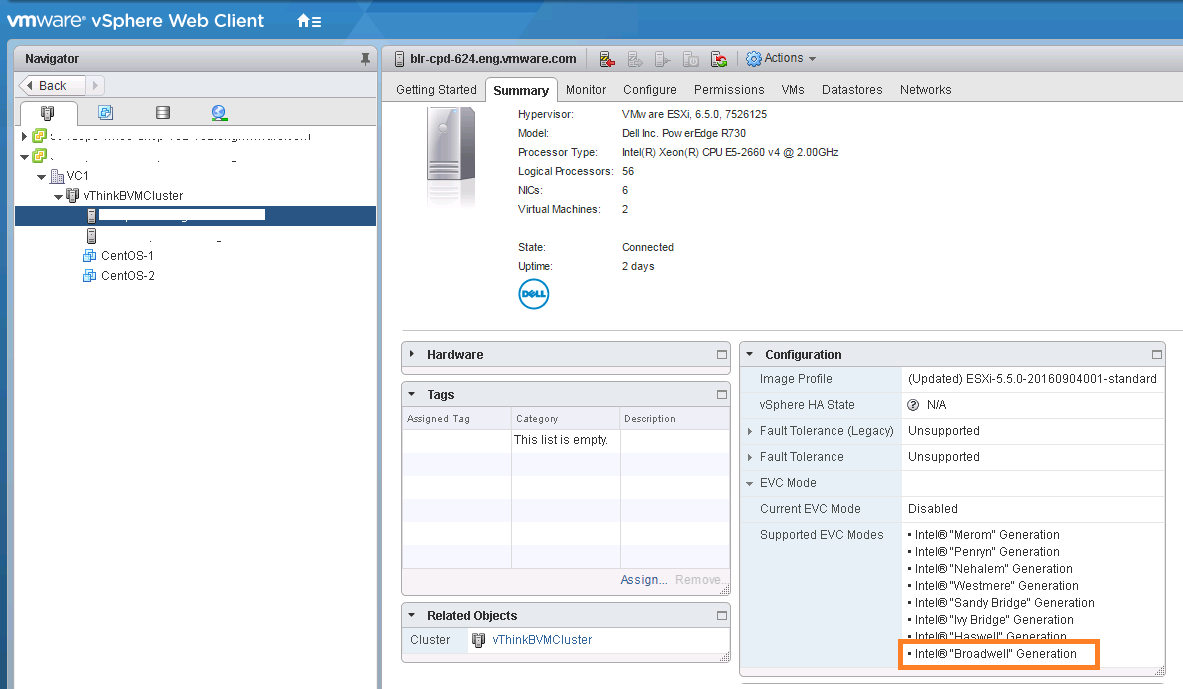
You may be wondering, can EVC modes supported per host be viewed from vSphere web client? Yes, it is, please take a look at below screenshot.

2. Enable EVC on cluster

Now that we have got max EVC mode per host, let us take a look at EVC API responsible to enable EVC on the cluster. i.e. ConfigureEvcMode_Task(). This API require EVC mode to be passed as parameter.

To start with, we will pass max EVCMode as “intel-broadwell” and see what happens. Lets take a look at script below.

Below script is available on my github repo enableEVC.py

[python]
from pyVim.connect import SmartConnect, Disconnect
from pyVmomi import vim
import atexit
import ssl
import sys

#Script to enable/disable EVC on cluster

s=ssl.SSLContext(ssl.PROTOCOL_TLSv1)
s.verify_mode=ssl.CERT_NONE
si= SmartConnect(host="10.160.50.60", user="Administrator@vsphere.local", pwd="VMware#12",sslContext=s)
content=si.content

#Your cluster input
cluster_name="vThinkBVMCluster"

# Below method helps us to get MOR of the object (vim type) that we passed.
def get_obj(content, vimtype, name):
obj = None
container = content.viewManager.CreateContainerView(content.rootFolder, vimtype, True)
for c in container.view:
if name:
if c.name == name:
obj = c
break
else:
obj = None
return obj

#Cluster object
cluster = get_obj(content,[vim.ClusterComputeResource],cluster_name)

# Major EVC cluster manager object
evc_cluster_manager=cluster.EvcManager()

print "ClusterName::"+cluster.name

# Configure EVC mode by passing EVCMode
task=evc_cluster_manager.ConfigureEvcMode_Task("intel-broadwell")

atexit.register(Disconnect, si)

[/python]

Notice the line #40, where method is called to enable EVC. Right after executing above script, I looked into web client to see whether EVC is really enabled or not and below is what I observed.

Error displayed above is expected since we are enabling EVC on cluster with “intel-broadwell” EVCMode, which has additional cpuid bits (CPU feature set) those are NOT available on other host inside the cluster. Since “intel-broadwell” is latest intel CPU model, “intel-sandybridge” host does not have new features available. In other words, host with “intel-sandybridge” EVCMode has all the cpu features are available on “intel-broadwell” based host but not the vice-versa, hence we can only enable EVC on cluster with “intel-sandybridge or lower EVCMode.

Now before I execute above script with “intel-sandybridge” EVCMode, I powered on all the VMs available inside the cluster, once VMs are powered ON, I executed above script by editing EVCMode as “intel-sandybridge” on line #40. Since “intel-sandybridge” cpu feature set is available on “intel-broadwell”, you might be hoping that EVC will be successfully enabled on cluster. Let us take a look at web client screenshot.

You could see EVC is NOT enabled again. You might be wondering why is EVC not enabled even though EVCMode is right? As error states, since cluster has Powered-ON VMs those can potentially be using CPU features, which can not be available after enabling EVC on “intel-sandybridge” mode. Reason is EVC will mask additional CPU features (from broadwell host) to have same CPU features across all the hosts inside cluster. I hope you are following.

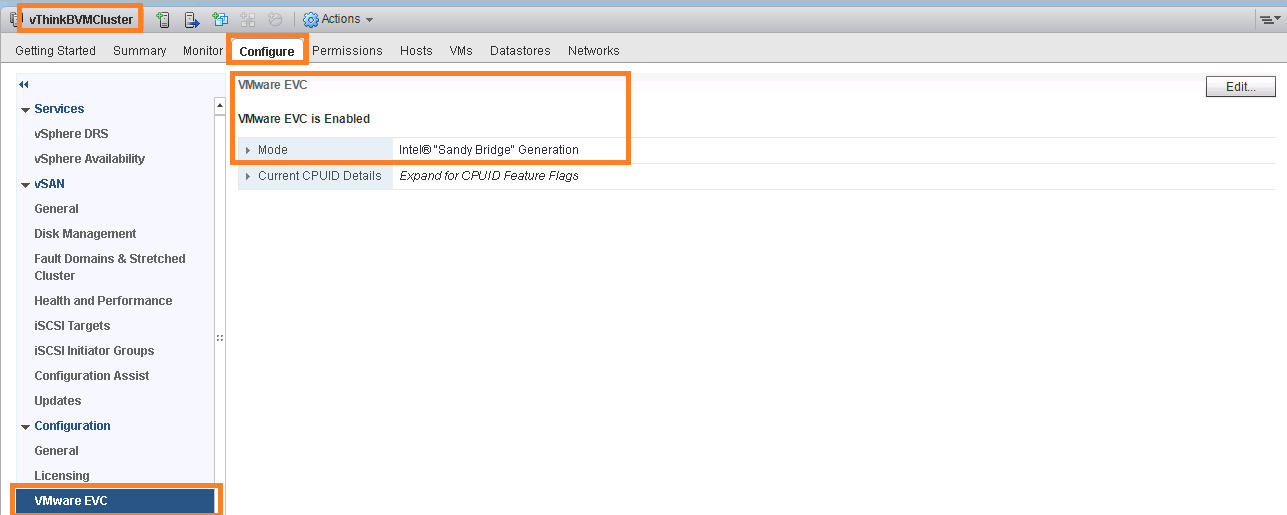
Now I powered-off and executed the script to enable EVC on “intel-sandybridge” mode. Let us take a look at below screenshot.

You can see EVC is enabled successfully, isn’t it cool?

Note: It is recommended to enable EVC on cluster with min of all hosts maxEVCMode key Ex. min (intel-sandybridge, intel-broadwell) = intel-sandybridge

3. Disabling EVC on cluster

Disabling EVC on cluster is fairly simple using DisableEvcMode_Task() , we have to just replace line #40 with below line.

[python]
task=evc_cluster_manager.DisableEvcMode_Task()
[/python]

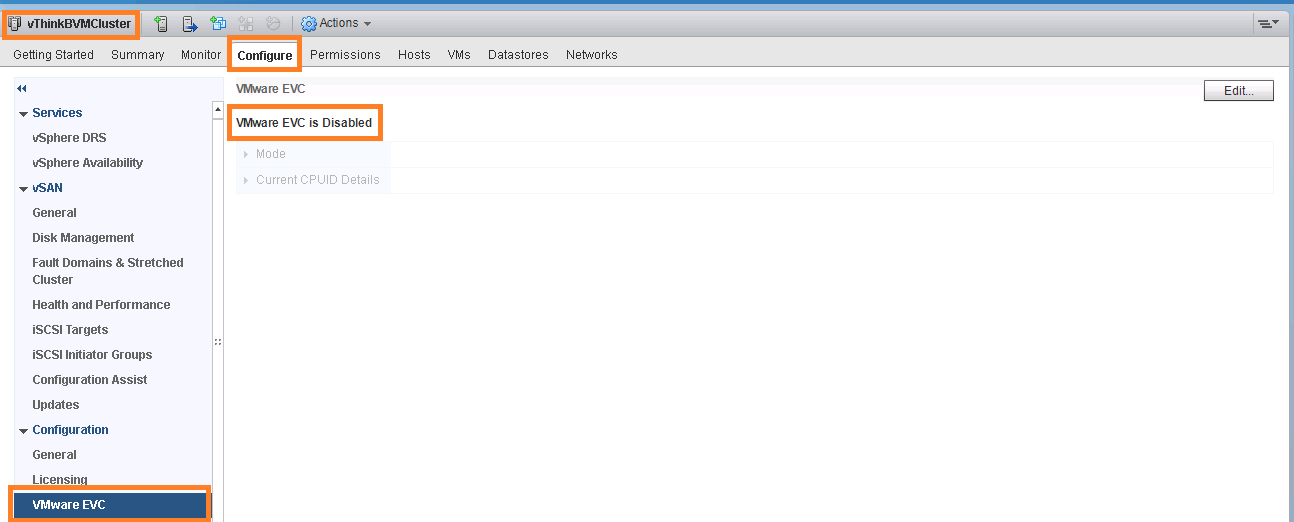
After making change as specified above, I confirmed from web client that EVC is successfully disabled. Please take a look at below screenshot.

EVC disabled

You can use Task object returned by ConfigureEvcMode_Task() & DisableEvcMode_Task() methods for tracking the task progress, any errors, state etc.

Now that you learned how to configure, enable & disable EVC on cluster, let us now learn how to know what cpu features are masked by EVC, what cpu features are available on each hosts inside EVC enabled cluster. If you ask me, again it is very simple.

4. Exploring EVC Cluster state

How to get current EVCMode enabled on cluster ? How to know whether EVC is disabled on cluster or not? How to get cpu features available & features masked on EVC cluster? All these questions are answered as part of below script.

Below script available on my github repo getEVCClusterState.py
[python]
from pyVim.connect import SmartConnect, Disconnect
from pyVmomi import vim
import atexit
import ssl
import sys
#Script to get Max EVC Mode supported on all the hosts in the cluster
s=ssl.SSLContext(ssl.PROTOCOL_TLSv1)
s.verify_mode=ssl.CERT_NONE
si= SmartConnect(host="10.160.50.60", user="Administrator@vsphere.local", pwd="VMware#12",sslContext=s)
content=si.content
cluster_name="vThinkBVMCluster"

# Below method helps us to get MOR of the object (vim type) that we passed.
def get_obj(content, vimtype, name):
obj = None
container = content.viewManager.CreateContainerView(content.rootFolder, vimtype, True)
for c in container.view:
if name:
if c.name == name:
obj = c
break
else:
obj = None
return obj

#Cluster object
cluster = get_obj(content,[vim.ClusterComputeResource],cluster_name)
evc_cluster_manager=cluster.EvcManager()

evc_state=evc_cluster_manager.evcState
current_evcmode_key= evc_state.currentEVCModeKey

if(current_evcmode_key):
print "Current EVC Mode::"+current_evcmode_key
else:
print "EVC is NOT enabled on the cluster"
quit()

feature_capabilities = evc_state.featureCapability

for capability in feature_capabilities:
print "Feature Capability\n"
print capability.featureName
print capability.key
print capability.value
print "————-"

features_masked = evc_state.featureMask

for mask in features_masked:
print "Feature Masked\n"
print mask.featureName
print mask.key
print mask.value
print "————-"
atexit.register(Disconnect, si)

[/python]

That is all for Part-1, I hope you enjoyed.

Update : Part-2 is ready as well, where we will explore remaining EVC APIs i.e. CheckConfigureEvcMode_Task() & CheckAddHostEvc_Task().

For more learning, EVC official documentation is here

PowerCLI script: How to hide the speculative-execution control mechanism for VMs running on affected processors ?

Here is the latest KB update from VMware on Hypervisor-Assisted Guest Mitigation for branch target injection. I would highly recommend you to read this latest KB to understand all minute details. As per KB, it is recommended NOT to apply recently released ESXi patches i.e. ESXi650-201801402-BG, ESXi600-201801402-BG, or ESXi550-201801401-BG on servers based out of affected processors. However, if you have already applied aforementioned patches on affected servers/hosts, VMware recommends to do following in order to hide the speculative-execution control mechanism for virtual machines(quoting from KB)

Update 03/20: As per this KB, new ESXi/vCenter patches are available. With new patches released as on 03/20, this post is NO more valid. Once you start applying new patches, please start using either PowerCLI script for confirming both hypervisor and microcode patches discussed on my earlier blog post or my latest pyVmomi script for the same.

Quote started

For servers using affected Intel processors (see Table 1.) that have applied ESXi650-201801402-BG, ESXi600-201801402-BG, or ESXi550-201801401-BG VMware recommends the following::

On each affected ESXi host, add the following line in the /etc/vmware/config file:
cpuid.7.edx = “—-:00–:—-:—-:—-:—-:—-:—-”
This will hide the speculative-execution control mechanism for virtual machines which are power-cycled afterwards on the ESXi host.
This line will need to be removed after applying a future fixed microcode from Intel in order to enable the full guest OS mitigations for CVE-2017-5715.
When convenient, power-cycle virtual machines on the affected ESXi hosts; rebooting of the ESXi host is not required.

Quote ended

The way I wrote a PowerCLI script for confirming patch validation, I thought it would be really handy to have another quick PowerCLI script to hide the speculative-execution control mechanism for virtual machines as suggested by VMware in KB.

What this script does?

1. Get all the connected hosts from specified vCenter server datacenter.
2. Start iterating through each ESXi host.
3. Check whether ESXi host max supported EVC mode is “intel-haswell” or “intel-broadwell”. If yes, script will then check whether new cpuids are really exposed to these hosts.
4. If new cpuids are exposed on haswell or broadwell hosts, it picks that host for adding “cpuid.7.edx = “—-:00–:—-:—-:—-:—-:—-:—-” into “/etc/vmware/config” file.
5. Before updating above file, script does check whether SSH is enabled on picked (haswell or broadwell) host, if SSH is not enabled, it does enable it.
6. If SSH on picked host is already enabled, it will create SSH session & takes the backup of the file /etc/vmware/config, which gets named as per time stamp.
7. Once file is backed up, it will go ahead and add “cpuid.7.edx = “—-:00–:—-:—-:—-:—-:—-:—-” line at the end of file “/etc/vmware/config”
8. Once file edit operation is done, script does disable SSH on the host where it was not enabled before editing. It also confirms whether SSH is really disabled.
9. Above steps will be repeated only for intel-haswell or intel-broadwell based hosts, where new cpuids are exposed.
10. It keeps logging (on console) the hosts which are edited/not-edited
11. Finally it disconnects vCenter server session.

This script is available on my on my git repo: hideNewCpuids.ps1

After executing above script, it is critical to do VM power-cycle (PowerOFF the VM & PowerON) to get this change affected. Once you do powerCycle, you may wonder how to verify whether speculative-execution control mechanism for virtual machines is actually got hidden or not. When we say “hide the speculative-execution control mechanism for virtual machines”, as earlier blog post pointed, it exposes new CPUIDs to the VM i.e. cpuid.IBRS, cpuid.IBPB, cpuid.STIBP. So it is meant that after script execution, once user does VM power-cycle, these CPUIDs should NO more be exposed to VMs.

How to quickly verify these cpuids are hidden from VM? It can easily done using vCenter MOB (Managed object browser) as follows:

1. To check whether host is having new cpuid capability: please use vCenter MOB (https:// your VC IP/mob): https://10.192.10.20/mob/?moid=host-10&doPath=config (replace your VC IP , host moid and check for “featureCapability” property, you will get list of new cpuids this host is capable of.

Note: Patched ESXi hosts continue to show new CPUIDs (value as 1) even after editing /etc/vmware/config file. This is expected since update to file /etc/vmware/config just hides speculative-execution control mechanism for virtual machines.

2. To check whether new cpuids are hidden from VM:
https://10.192.10.20/mob/?moid=vm-19&doPath=runtime (replace your VC IP , vm moid and check for “featureRequirement” property.

Result:
Before editing file /etc/vmware/config: “”featureRequirement” property of VM shows new CPUIDs i.e. cpuid.IBRS, cpuid.IBPB, cpuid.STIBP

After editing file /etc/vmware/config : “”featureRequirement” property of VM does NOT show new CPUIDs (PowerCycle needed). i.e. cpuid.IBRS, cpuid.IBPB, cpuid.STIBP

How to restore the host to old state? i.e. before editing /etc/vmware/config file
– Before doing this, do make sure that you completely understand the impact it can have on your environment. KB #52345 gives more details.
– To restore, you can either remove added line from /etc/vmware/config or you can comment out using “#” as prefix. To verify this change, you will have to do powercycle. No host reboot required as specified in KB post file update.

Notes:
1. For the sake of simplicity I have hardcoded some values, please do change as per your environment.
2. If you have any comment/feedback on above script, please do provide.
3. I have tested this script on vCenter/ESXi 6.0 & it worked as expected for me.

Additional references:
1. If you are new to MOB, refer official doc

2. I would like to acknowledge this post on Posh-SSH module. I leveraged SSH part of it.

3. If you want to verify above change using PowerCLI, you can leverage nice script written by our own William Lam here.

4. I may write a python script using pyVmomi for verification similar to what we did using MOB above.

I hope this post was useful, please share as appropriate.

PowerCLI script : How to confirm a ESXi VMware hypervisor & microcode patches are applied?: Spectre vulnerability

Some time back, VMware has released one of important KBs on “Hypervisor-Assisted Guest Mitigation for branch target injection”. Please take a look at this KB here. In this KB, there is one important section on “how to confirm a host has both patched microcode and patched VMware hypervisor?” and below is what is posted on KB.

Confirmation of Correct Operation
To confirm a host has both patched microcode and patched VMware hypervisor, use the following steps:
1.Power on a Virtual Machine which is configured to use Virtual Hardware Version 9 or later.
2.Examine the vmware.log file for that VM and look for one of the following entries:
“Capability Found: cpuid.IBRS”
“Capability Found: cpuid.IBPB”
“Capability Found: cpuid.STIBP”
3. Any of the above log entries indicates that both the CPU microcode and hypervisor are properly updated.

I thought it would be really handy if we automate it using PowerCLI. Accordingly, I started looking for any existing cmdlets which can help me to retrieve the VM logs (specially vmware.log) and I could see PowerCLI guru Luc Dekens had written a article on retrieving VM logs long back. I leveraged the same and came up with one quick PowerCLI script to confirm whether a host has both patched microcode and patched VMware hypervisor or not. Here we go.

Update 03/20: As per this KB, new ESXi/vCenter patches are available, hence update (01/13) posted below is no more valid. Once you start applying new patches, please start using either PowerCLI script discussed in this blog post or my latest pyVmomi script for the same.

Update 01/13: As per latest update from VMware on KB, I have published another PowerCLI script, I recommend you to take a look at it before reading this post further.

Script execution steps:
i) It gets all the connected hosts inside the specified cluster. It can be easily modified to consider host from particular datacenter as mentioned above.
ii) It will then iterate through each host in sequence and create a dummyVM.
iii) DRS automation on created dummyVM will be disabled since we need to powerON the VM and if DRS is enabled on the cluster, as part of DRS initial placement workflow, it may place/powerON the VM on some other host inside the cluster.
iv) Now it will powerON the dummyVM
v) Download the vmware.log file at specified location
vi) Scan for the log lines specified in KB (posted above) & record the results.
vii) PowerOff the created VM (to avoid any disk space utilization, you can choose to delete this VM as well)
viii) Step iii) through viii) will repeated for every host inside the cluster.
xi) Finally log the result into one CSV file. CSV file will have HostName & Status (Patched or Un-Patched). Refer CSV sample below.

Script is available on my git-hub repo as well

Sample CSV file result:
#TYPE Selected.System.String
“HostName”,”Status”
“10.20.30.20”,”Patched”
“10.20.30.21”,”Un-Patched”

Notes:
1. For the sake of simplicity I have hardcoded some values, please do change as per your environment.
2. If you have any comment/feedback on above script, please do provide.
3. There can be other ways to automate the same. Since I started with this approach, I continued. I haven’t yet thought about other approach (probably we may be able to just use datastore browser APIs to navigate/scan vmware.log file instead of downloading it outside).
4. I would recommend you to use this script as sample and make changes as needed. Let me know what changes you did or probably any other way you found.
5. I have tested this script on vCenter/ESXi 6.5 & it worked as expected for me. I will update this article as I update above script

Note: I would like you to understand “vMotion and EVC Information” section from KB, specially below lines. Let me know if you have any doubts I can share my understanding.

“In order to maintain this compatibility the new features are hidden from guests within the cluster until all hosts in the cluster are properly updated”

Some must read links:
1. VC 6.5 U1g release notes
2. VC 6.0 U3e release notes
3. VC 5.5 U3h release notes
4. Microsoft has released similar validation script for their Guest OS

Further learning:

1. I highly recommend you take a look at last post on EVC cluster.
2. Empty EVC cluster issue discussed here is fixed with latest vCenter Patches

I hope this will be helpful.

How to deploy vCenter HA using pyVmomi?

In part 1, we explored new vCenter HA APIs for managing vCenter HA. In part 2, we will focus on how to deploy vCenter HA using pyVmomi. As I pointed in part-1, managed object FailoverClusterConfigurator is responsible for deploying vCenter HA & below are the methods exposed by this managed object.

  • deployVcha_Task
  • configureVcha_Task
  • createPassiveNode_Task
  • createWitnessNode_Task
  • destroyVcha_Task

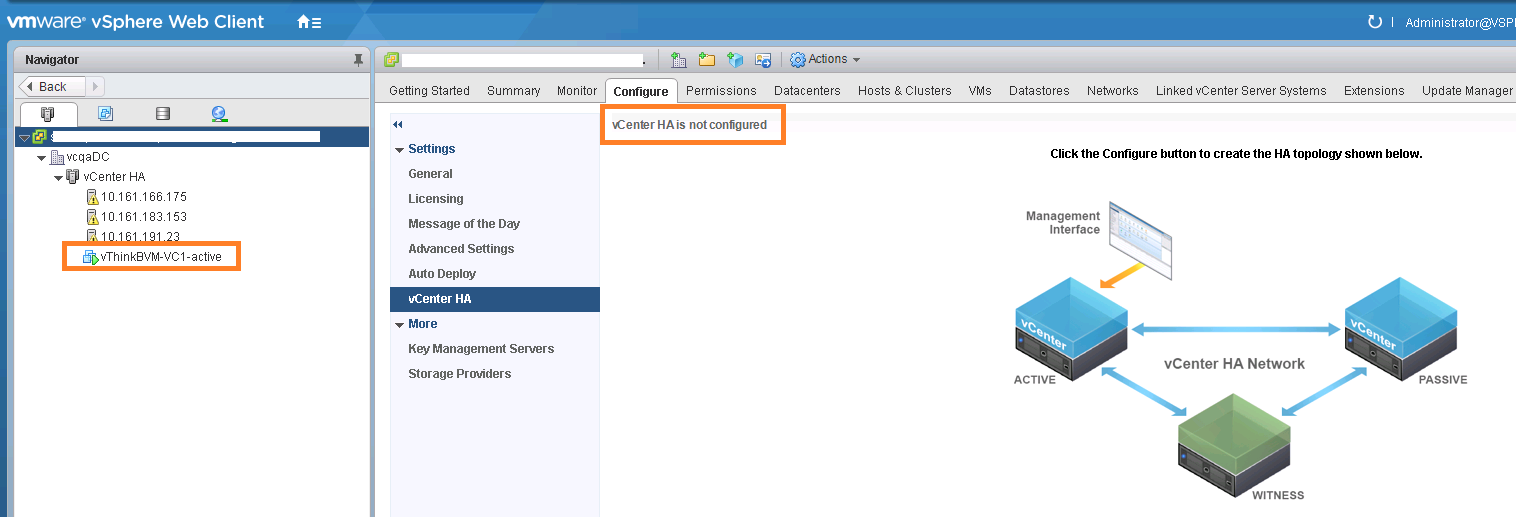
Let us start with first and important method i.e.  deployVcha_Task() : This method is really handy when user wants to deploy as well as configure vCenter HA in single call. I will encourage you to read vSphere API reference for more details on this method. This method assumes that you already deployed vCenter server,which would act as active node and created required vCenter HA network. As I wanted to deploy vCenter HA in basic mode, I created my self managed vCenter server as shown below & configured required vCenter HA network.

Before you start deploying your active node, please take a look at vCenter HA software & hardware requirement. I would also recommend you to just overview this & this documentation. If you need any help on deploying active node, please let me know, I would be happy to help you.

Lets take a look at code now. Note that detailed code documentation is added inside script itself for your easy reference & all below scripts are available on my github repo as well.

[python]

from pyVim.connect import SmartConnect
from pyVmomi import vim
import ssl
# Deploying vCenter HA in basic mode using self managed VC

s=ssl.SSLContext(ssl.PROTOCOL_TLSv1)
s.verify_mode=ssl.CERT_NONE
si= SmartConnect(host="10.161.34.35", user="Administrator@vsphere.local", pwd="VMware#23",sslContext=s)
content=si.content

#Parameters required are hardcoded below, please do change as per your environment.

vcha_network_name="VCHA" #port group name, I am using standard switch.
vcha_dc_name="IndiaDC" #Datacenter name
vcha_subnet_mask="255.255.255.0" #Subnect mask for vCenter HA/Private network
active_vcha_ip="192.168.0.1" # Active node vCenter HA IP
passive_vcha_ip="192.168.0.2" # Passive node vCenter HA IP
witness_vcha_ip="192.168.0.3" # Witness node vCenter HA IP
active_vcha_vm_name="vThinkBVM-VC1" #Active node/VC VM name
active_vc_username="Administrator@vsphere.local" #Active VC username
active_vc_password="VMware#23" #Active VC password
active_vc_url="https://10.61.34.35" #Active VC public IP
active_vc_thumbprint="55:A9:C5:7E:0C:CD:46:26:D3:5C:C2:92:B7:0F:A7:91:E5:CD:0D:5D" #Active VC thumbprint
passive_vc_datastore="SharedVMFS-1" #Passive node datastore
witness_vc_datastore="SharedVMFS-2" #Witness node datastore

vcha=si.content.failoverClusterConfigurator #Getting managed object responsible for vCenter HA deployment

# Below method helps us to get MOR of the object (vim type) that we passed.
def get_obj(content, vimtype, name):
obj = None
container = content.viewManager.CreateContainerView(content.rootFolder, vimtype, True)
for c in container.view:
if name:
if c.name == name:
obj = c
break
else:
obj = None
return obj

vcha_network=get_obj(content,[vim.Network],vcha_network_name)
vcha_dc=get_obj(content,[vim.Datacenter],vcha_dc_name)

#I would highly recommend to read vSphere API reference for "failoverClusterConfigurator", this will help to understand below specs.

deployment_spec=vim.vcha.FailoverClusterConfigurator.VchaClusterDeploymentSpec()

#Active node related data/parameter population
active_nw_config_spec=vim.vcha.FailoverClusterConfigurator.ClusterNetworkConfigSpec()
active_nw_config_spec.networkPortGroup=vcha_network
active_ipSettings=vim.vm.customization.IPSettings()
active_ipSettings.subnetMask = vcha_subnet_mask
active_ip_spec=vim.vm.customization.FixedIp()
active_ip_spec.ipAddress= active_vcha_ip
active_ipSettings.ip=active_ip_spec
active_nw_config_spec.ipSettings=active_ipSettings
deployment_spec.activeVcNetworkConfig=active_nw_config_spec

#Active node service locator
active_vc_spec=vim.vcha.FailoverClusterConfigurator.SourceNodeSpec()
active_vc_vm=get_obj(content,[vim.VirtualMachine],active_vcha_vm_name)
active_vc_spec.activeVc=active_vc_vm
service_locator=vim.ServiceLocator()
cred=vim.ServiceLocator.NamePassword()
cred.username=active_vc_username
cred.password=active_vc_password
service_locator.credential=cred
service_locator.instanceUuid=si.content.about.instanceUuid
service_locator.url=active_vc_url #Source active VC
service_locator.sslThumbprint=active_vc_thumprint
active_vc_spec.managementVc=service_locator
deployment_spec.activeVcSpec=active_vc_spec

#Passive node configuration spec
passive_vc_spec=vim.vcha.FailoverClusterConfigurator.PassiveNodeDeploymentSpec()
passive_ipSettings=vim.vm.customization.IPSettings()
passive_ipSettings.subnetMask = vcha_subnet_mask
passive_ip_spec=vim.vm.customization.FixedIp()
passive_ip_spec.ipAddress= passive_vcha_ip
passive_ipSettings.ip=passive_ip_spec
passive_vc_spec.ipSettings=passive_ipSettings
passive_vc_spec.folder=vcha_dc.vmFolder
passive_vc_spec.nodeName= active_vcha_vm_name+"-passive"
passive_datastore=get_obj(content,[vim.Datastore],passive_vc_datastore)
passive_vc_spec.datastore=passive_datastore
deployment_spec.passiveDeploymentSpec=passive_vc_spec

#Witness node configuration spec
witness_vc_spec=vim.vcha.FailoverClusterConfigurator.NodeDeploymentSpec()
witness_ipSettings=vim.vm.customization.IPSettings()
witness_ipSettings.subnetMask = vcha_subnet_mask
witness_ip_spec=vim.vm.customization.FixedIp()
witness_ip_spec.ipAddress= witness_vcha_ip
witness_ipSettings.ip=witness_ip_spec
witness_vc_spec.ipSettings=witness_ipSettings
witness_vc_spec.folder=vcha_dc.vmFolder
witness_vc_spec.nodeName=active_vcha_vm_name+"-witness"
witness_datastore=get_obj(content,[vim.Datastore],witness_vc_datastore)
witness_vc_spec.datastore=witness_datastore
deployment_spec.witnessDeploymentSpec=witness_vc_spec

# Calling the method we aimed to invoke by passing complete deployment spec

task= vcha.deployVcha_Task(deployment_spec)

if(task.info.state == "running"):
print "VCHA deployment is started, it will take few minutes, please monitor web client for its completion"

[/python]

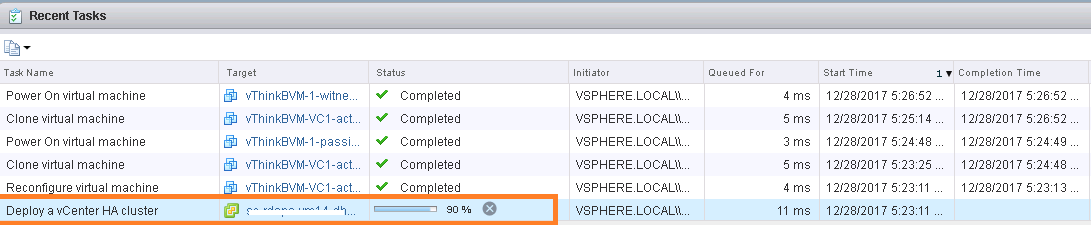
As soon as we invoke deployVcha_Task() method, it deploys vCenter HA in basic mode where it also creates passive and witness node. Below is how it looks when looked into web client recent task pane.

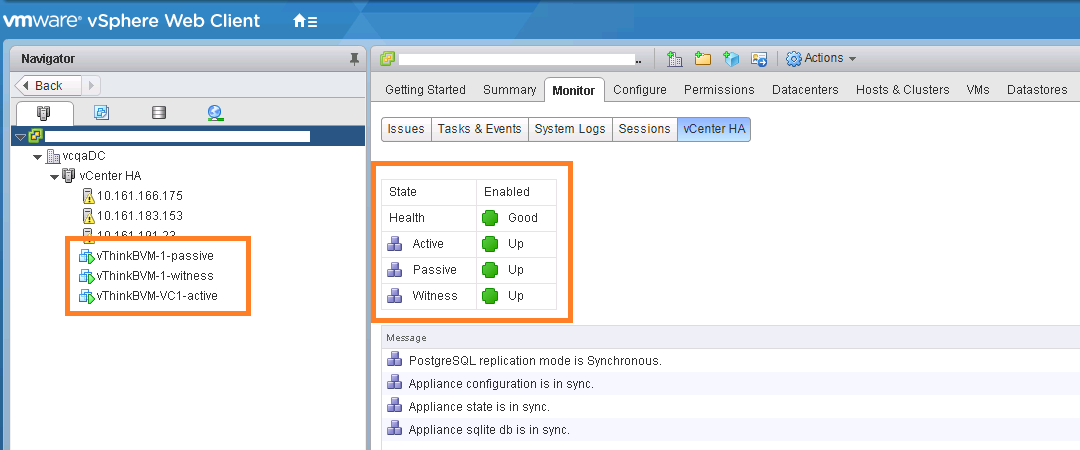
We can see that “Deploy VCHA” task is running, it has in-turn cloned passive/witness nodes and initiated powereON operations. I waited for some time for deploy VCHA task to get completed. After completion, below is how vCenter HA VMs look from web client.

Note: You might have noticed that we need to have vCenter active node thumbprint to be passed in VCHA spec. I could get this thumbprint by using openssl command as shown here. In fact, there are some other ways to get it as well.

Now that we deployed VCHA successfully, let us take a look at how to destroy the vCenter HA using method “destroyVcha_Task()”: This method can be invoked when VCHA is disabled, isolated or its configuration is failed. In my case, I chose to disable the existing VCHA by using method “setClusterMode_Task()” , which we already explored in Part-I. Lets take a look at the code.

[python]
from pyVim.connect import SmartConnect
from pyVmomi import vim
import ssl
#Destroy vCenter server HA
s=ssl.SSLContext(ssl.PROTOCOL_TLSv1)
s.verify_mode=ssl.CERT_NONE
si= SmartConnect(host="10.161.34.35", user="Administrator@vsphere.local", pwd="VMware#23",sslContext=s)
content=si.content

#Getting VCHA configurator managed object
vcha=si.content.failoverClusterConfigurator

#Getting VCHA cluster manager
vcha_cluster_manager=si.content.failoverClusterManager

# Setting vCenter HA to "disabled" mode.
task = vcha_cluster_manager.setClusterMode_Task("disabled")
while(task.info.state != "success"):
continue

#Getting VCHA cluster mode
VCHA_mode=vcha_cluster_manager.getClusterMode()
if (VCHA_mode == "disabled"):
vcha.destroyVcha_Task() #Destroing it
else:
print "VCHA must be in disabled mode before destrying it"

[/python]

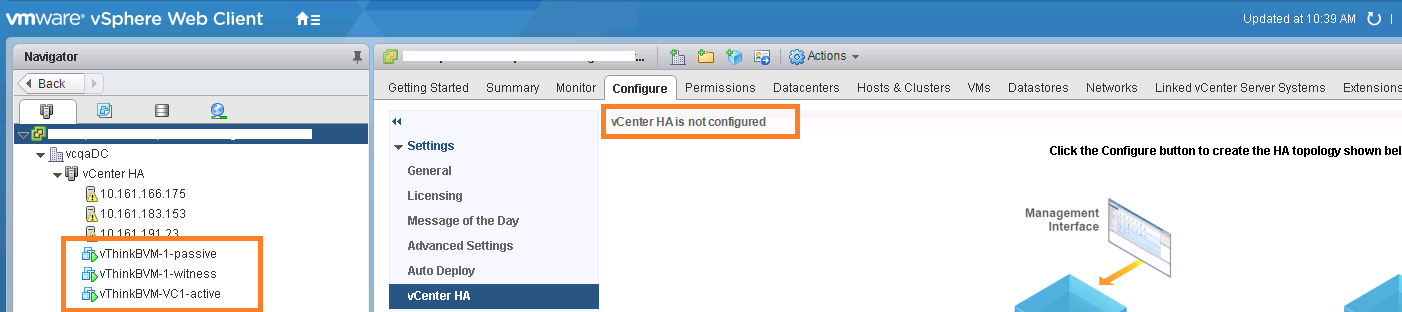
When I executed above script, I could see from web client that vCenter HA mode got set to disabled followed by vCenter HA was getting destroyed. Please take a look at below screenshot to confirm it

I waited for few seconds & I could see, vCenter HA is destroyed as shown in below screenshot.

Note that once we destroy VCHA using above method, active node will continue to work fine & serve client requests. This API just destroys the VCHA configuration. It does not delete passive & witness node by itself. To delete passive & witness node, you will have to use regular VM destroy API (This option is provided in UI as part of vcenter HA destroy UI workflow)

Moving on to other methods exposed by managed object “FailoverClusterConfigurator”, it seems these methods (listed below) are directly suited when VCHA is deployed using advanced option

configureVcha_Task(),
createPassiveNode_Task(),
createWitnessNode_Task()

Since I had deployed vCenter HA using basic option, I will talk about above methods in my future post or will add samples on my github repo. On the other side, you can refer all the scripts discussed in part-1,2 & easily code around those as well. If you ask me, it would be really good exercise to understand vCenter HA APIs.

Notes:
1. All above scripts are available on my github repository as well. Even, I have a plan to write one nice python module for the same.
2. Note that, for the sake of simplicity, I have hard-coded some values & disabled certificate validation, hence please do appropriate changes as per your environment.
2. I highly recommend you to read Part 1
3. Finally, if you haven’t yet set up “pyVmomi” environment, refer my blog post