Category Archives: HOME

New fling : DRS Entitlement Viewer: a feature walk-through

A cool new fling was just released i.e. DRS entitlement viewer. As stated on fling site

“DRS entitlement viewer gives the hierarchical view of vCenter DRS cluster inventory with entitled CPU and memory resources for each resource pool and VM in the cluster”.

Good thing about this fling is that it will be deployed as HTML5 client plugin, which enables you to enjoy its features from vSphere H5 client itself. As requirement we need to have “vCenter server Appliance 6.5 or 6.7”.  Let us take a look at how to deploy. I fyou ask me, it is pretty easy and quick.

  • Fling Deployment

Step 1: Unzip the plugin package (downloaded zip bundle from fling site) to directory “/usr/lib/vmware-vsphere-ui/plugin-packages/” . Below is how it should look like. Note the exact fling directory and its content.

Step 2: Setting advanced options “CompressDrmdumpFiles set to 0” and “DrmdumpResActions set to 1”. Below is how it looks.
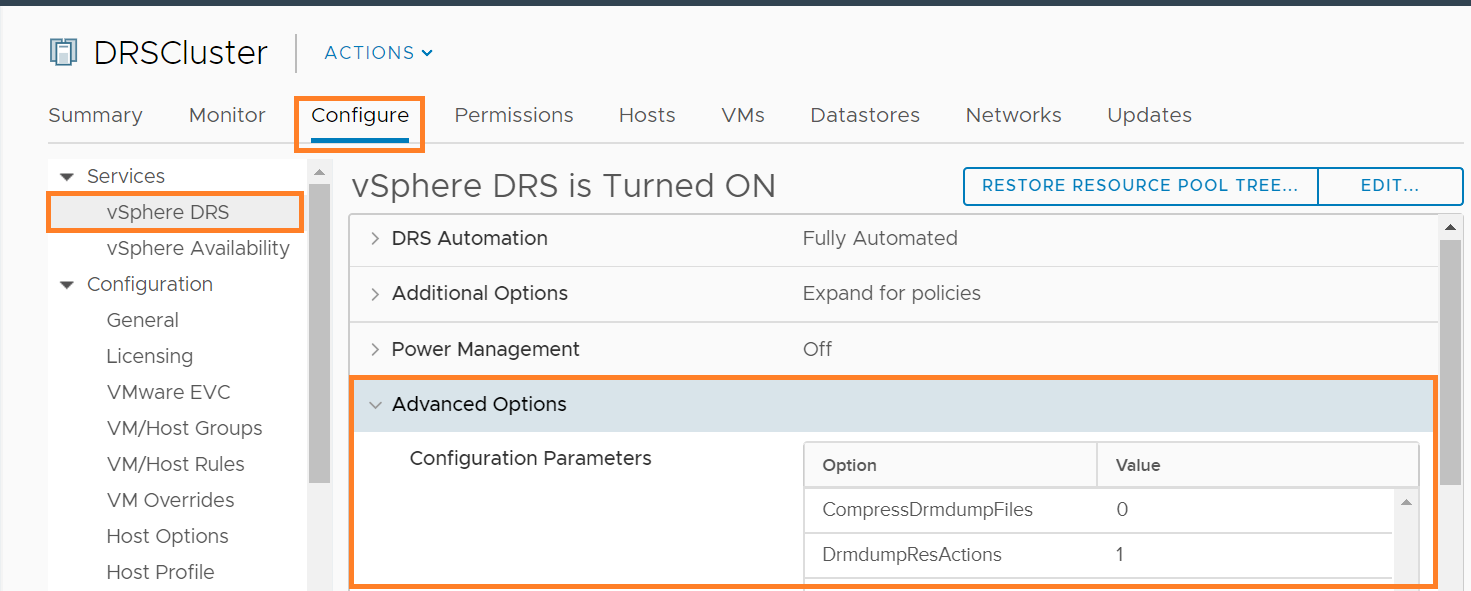
You can also add these DRS cluster level advanced options using below PowerCLI code. You can extend this code to configure these options on all the DRS clusters in your vCenter server.

[powershell]

$Cluster = Get-Cluster "Your cluster Name"
$Cluster | New-AdvancedSetting -Name CompressDrmdumpFiles -Value 0 -Type ClusterDRS
$Cluster | New-AdvancedSetting -Name DrmdumpResActions -Value 1 -Type ClusterDRS

[/powershell]


Step 3: Restart vSphere H5 client service using below commands.

service-control –stop vsphere-ui
service-control –start vsphere-ui
Note: before stop or start, there are 2 hyphens.

Above step can be automated using vCenter REST APIs as well (either using PowerCLI or any other programming language without SSH connection)

I think, even first step can be automated using “ExtensionManager() vSphere API” without making any SSH connection to vCenter server appliance. (more on this in future post)

  • Fling features

As soon as vSphere H5 client is up, we should be able to see  the new “DRS entitlements” section under the “Monitor” tab for each Cluster. When I logged into my local H5 client, I was able to see below DRS entitlement from CPU and Memory perspective.
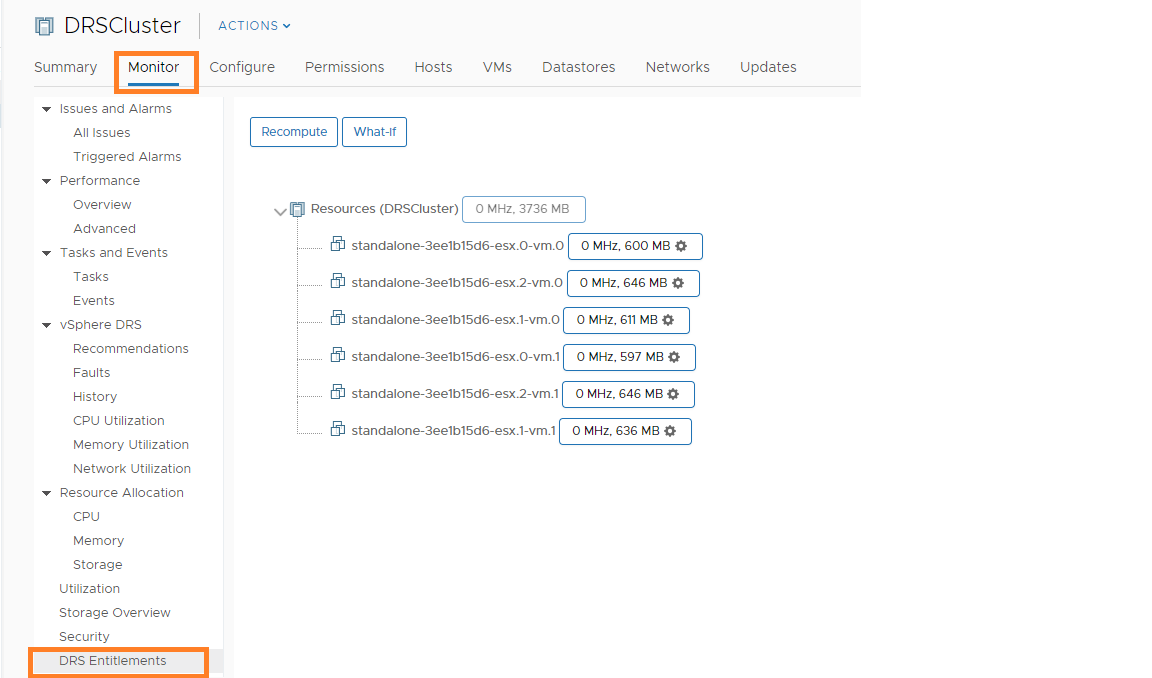
You can see DRS entitlement for every VM is showcased. You may wonder how come CPU entitlement is 0 MHz?. The reason is that, all VMs are completely idle, hence that is absolutely expected. As a first step, you just need to click on “recompute” to get the current DRS entitlement across all VMs/ResourcePools. Note that when you actually do some RLS changes on clustered VMs/RPs and you would like to see updated DRS entitlement, you will have to either click “Run DRS” or wait till default DRS execution (every 5 min).

One of the most impressive features of this fling is having ability to do “What if” analysis. Below 3 super cool scenarios are supported.

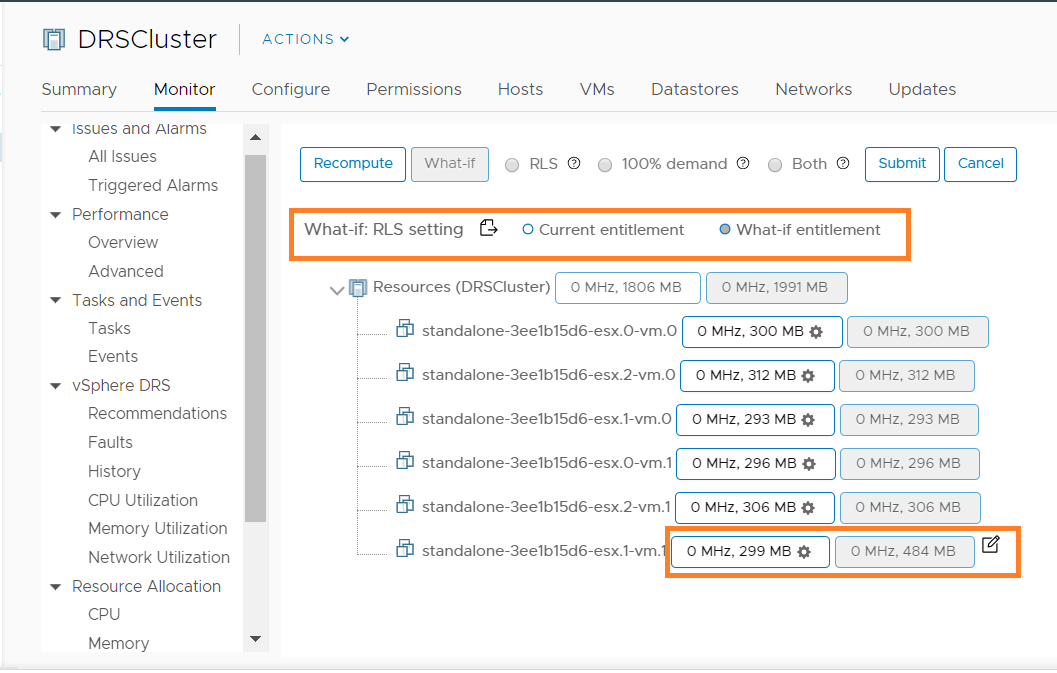
#1. What if user modifies RLS settings across VMs or resource pools across clusters. (RLS : Reservation, Limit, Shares). To try out this, first select RLS radio button and you can choose to simulate the RLS settings for one or more VMs/RPs (there is settings icon for every VM/RP except root). Finally click on “submit” button to get an idea on change in DRS entitlement for those VMs/RPs for which RLS settings were modified. Please take a look at below couple of screenshots to understand this better.
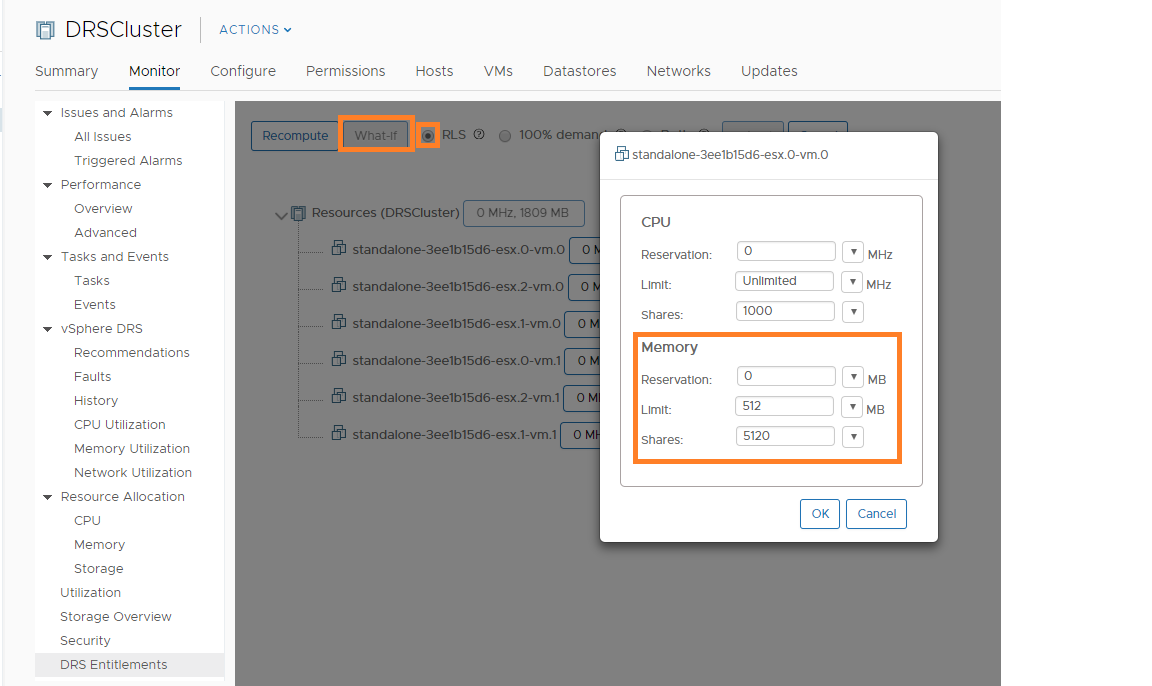
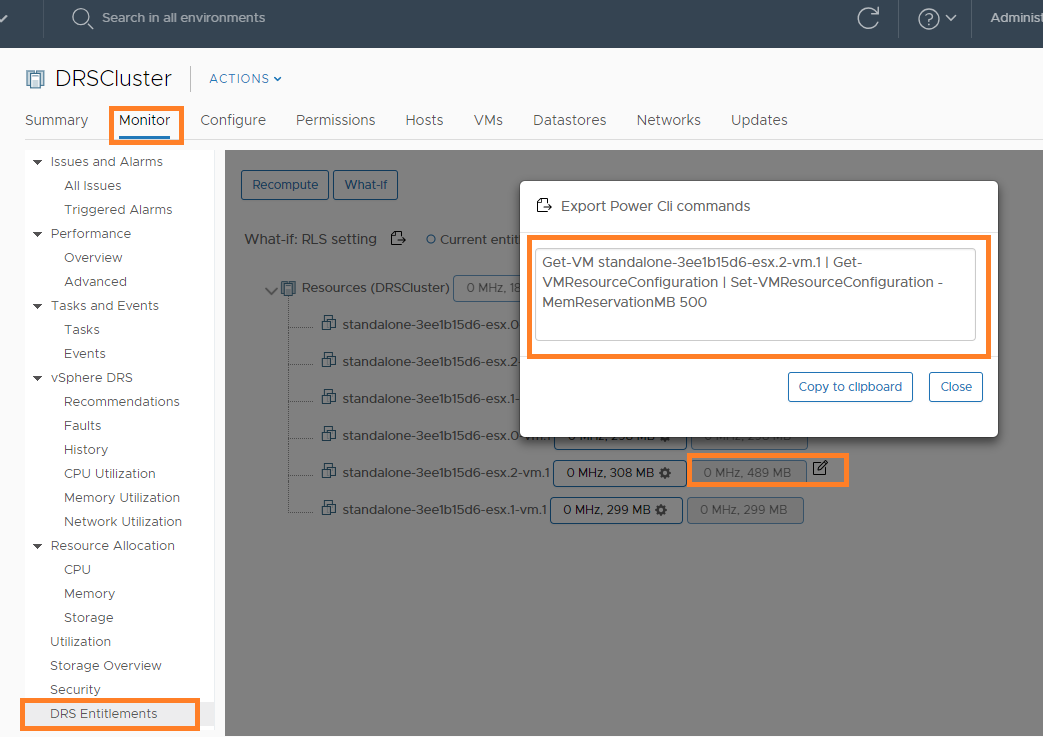
I simulated one of VM’s memory reservation to “500 MB” and once I “submit” this change, below is how What if analysis looks like.
#2: What if all the VMs’ resource demand is at 100%. I did try this analysis and below is how it was looking like. How cool is that?
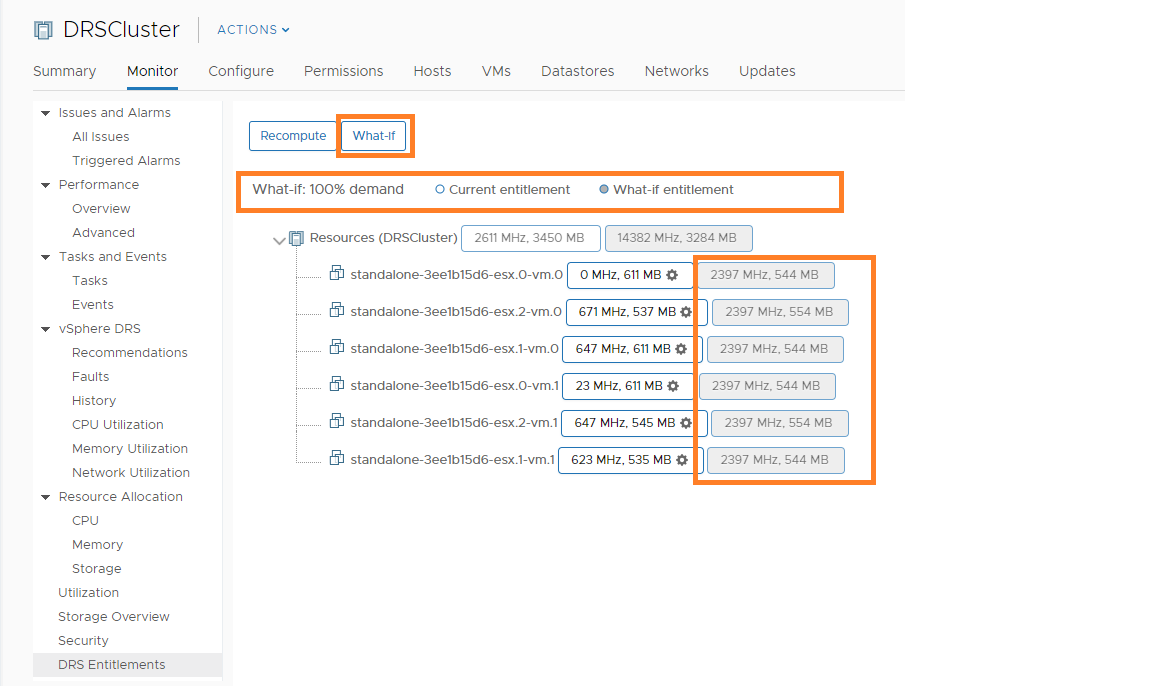
#3: You can have What if analysis for both RLS and 100% both at the same time

Note: As specified above, RLS changes are just simulations, it does not actually get updated on VMs/RPs. How cool it is to do this analysis without even updating actual RLS settings on cluster!  Also,  I would highly recommend you to read the user guide to understand all What if scenarios in detail and rest of the features.

Another impressive feature is to have option to get “PowerCLI” code snippet to actually update RLS settings once your analysis is done. Please take a look at one of the examples.
I am sure this fling would be very handy for you. If you have any doubts or need any help, please leave the comment.

Below are some of the very handy DRS flings

Cluster Rules Manager

DRS lens

DRS doctor

DRS dump insight


vSphere 6.7 : What is PMem and How vSphere DRS works with PMem configured VMs?

vSphere 6.7 supports one of the exciting technologies on computer memory i.e. Non-Volatile Memory (NVM) or persistent memory (PMem).  In this post my focus is on briefing what is PMem technology and explore how DRS works with PMem configured VMs.

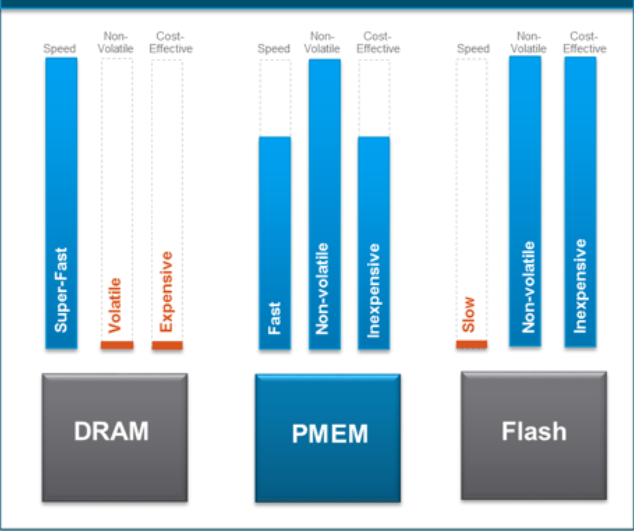
Image is taken from VMware site
What is Persistent Memory (PMem)?

In brief, PMem is next generation memory technology whose data transfer speed is as good as DRAM (50-300 ns, 100 times faster than SSDs) and unlike DRAM, it can even retain the data after reboots .  If you ask me, it is going to greatly improve the performance of applications running performance sensitive workloads  ex. analytics and acceleration databases etc. The virtual machines, which require low latency, high bandwidth and at the same time persistence are right workloads to be benefited from this technology.

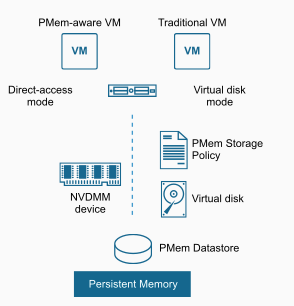
Below diagram highlights the 2 modes supported by vSphere.

PMem modes supported on vSphere

i) Direct-access mode (vPMem): It requires hw-version 14 and PMem-aware VMs ex. Windows server 2016 or RHEL 7.4.x

ii) Virtual Disk mode (vPMemdisk): This works with legacy/traditional VMs, no requirement of having hw version 14 and VM need not to be PMem aware.

If you want to understand more about PMem technology , I would recommend you to watch this youtube presentation by VMware’s CTO Richard B.

vSphere DRS interop with PMem VMs

First of all, I deployed one quick lab setup: 1 vCenter, 3 ESXi hosts and simulated PMem on 2 out of 3 hosts. All these 3 hosts are inside the DRS enabled cluster. Since I do not have any PMem aware VMs, I explored PMem in vPMemdisk mode i.e. Virtual Disk Mode pointed above

Note: I did simulate PMem on  2 hosts  using a cool hack provided by engineering i.e. by running this esxcli command “esxcli system settings kernel set -s fakePmemPct -v 33”. Note that simulation must be used for lab or educational purposes only. William has written a nice article on the same as well.

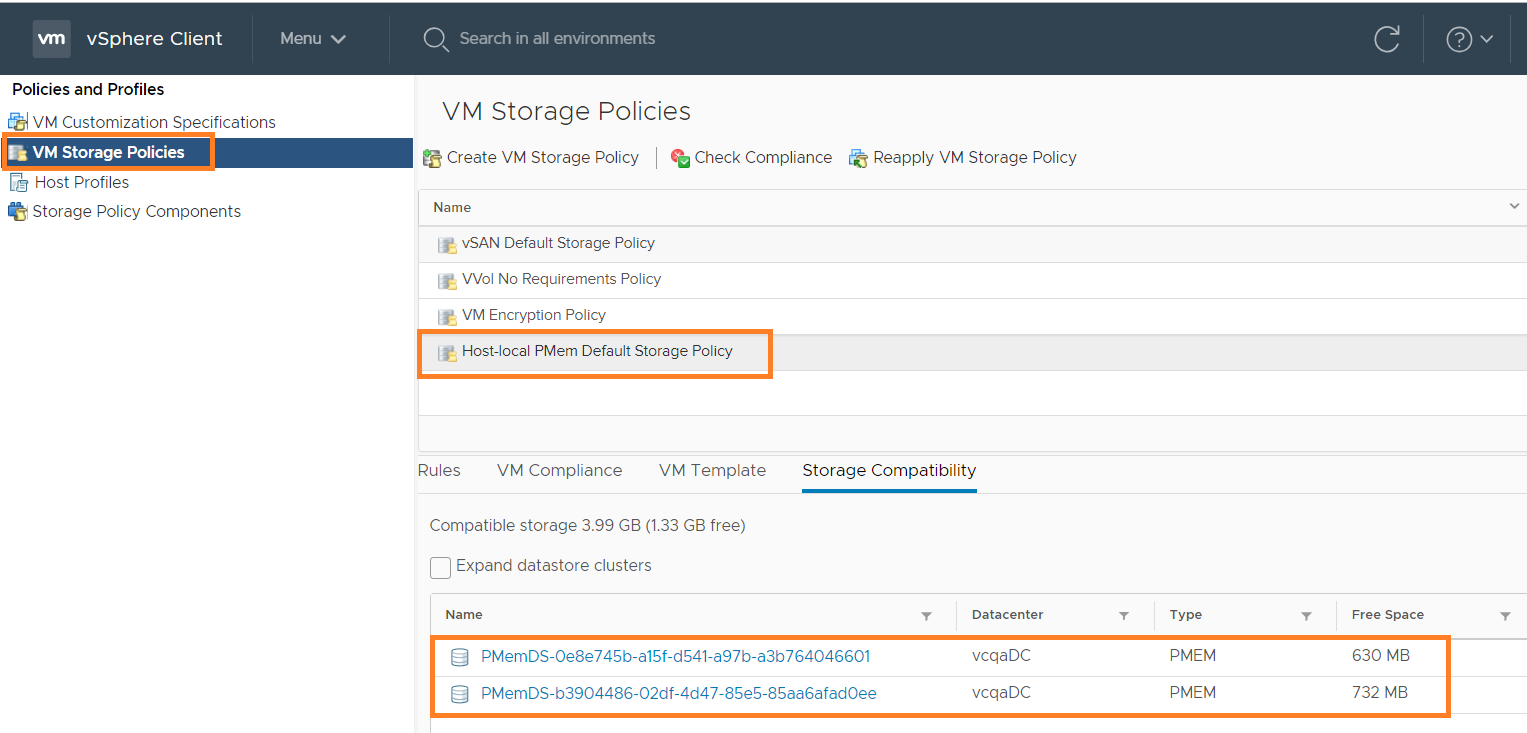
Below is how the PMem storage policy and PMem local datastores look like


Now that we have required PMem simulated hosts, lets start exploring how DRS works with PMem. Since I did not have any PMem aware guest, as I said earlier, I explored PMem with DRS in virtual disk mode described above i.e. vPMemDisk, which works fine for legacy guest OSes. Below are my observations on the same.

i) VM creation work-flow (vSphere H5 client)

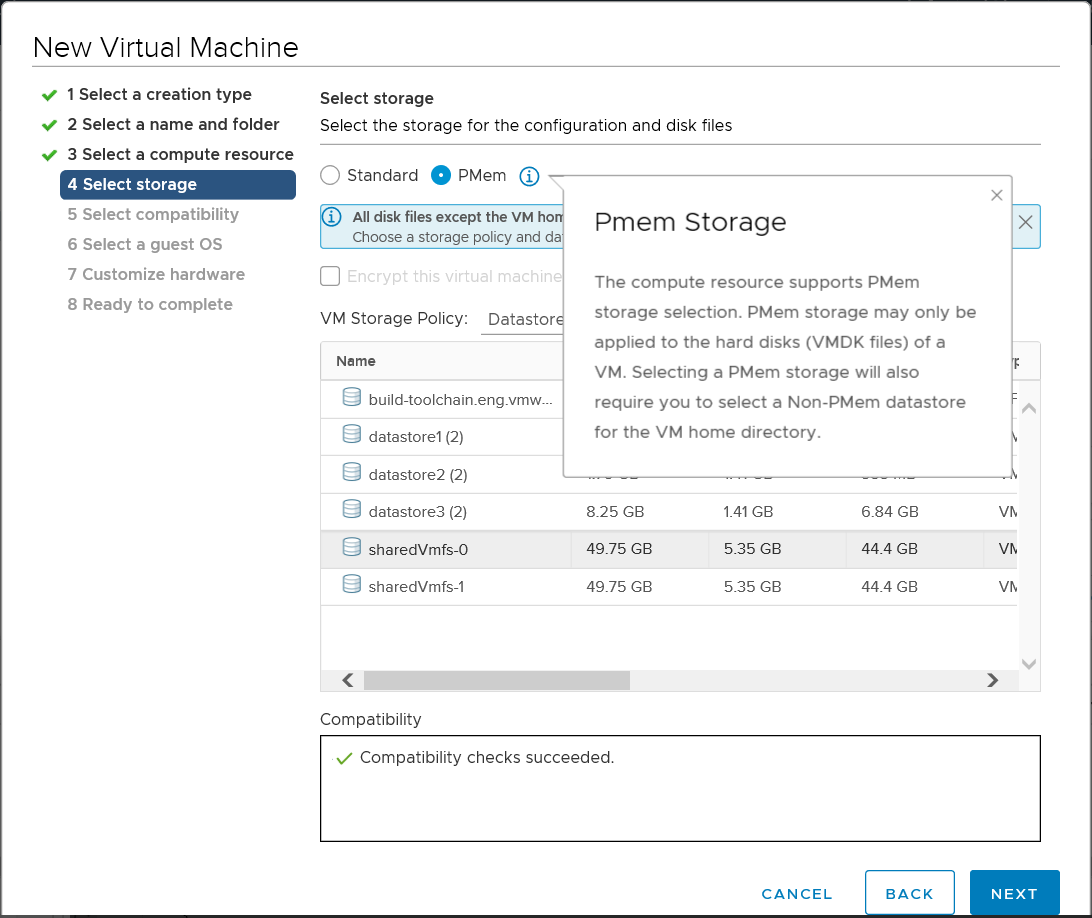
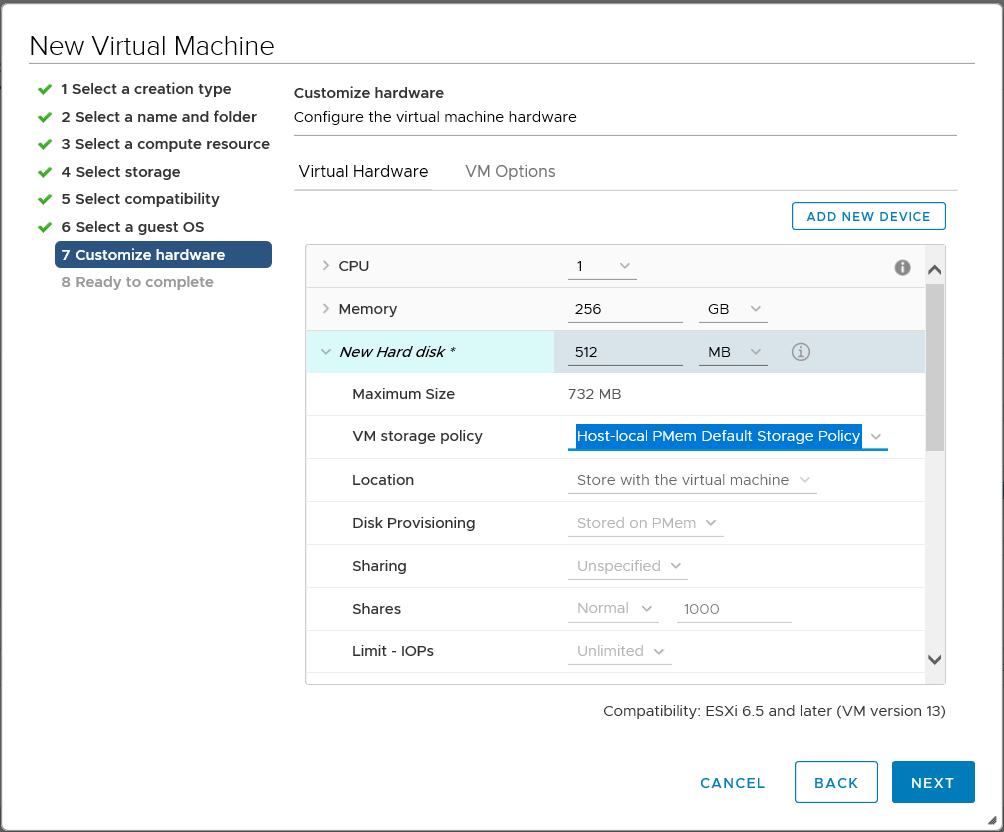
I created a VM with PMem of size 512 MB on DRS cluster. Below screenshot shows how PMem can be selected as storage.

Below screenshot shows how PMem storage policy comes into picture. This policy gets selected automatically once you select “PMem” as shown above.

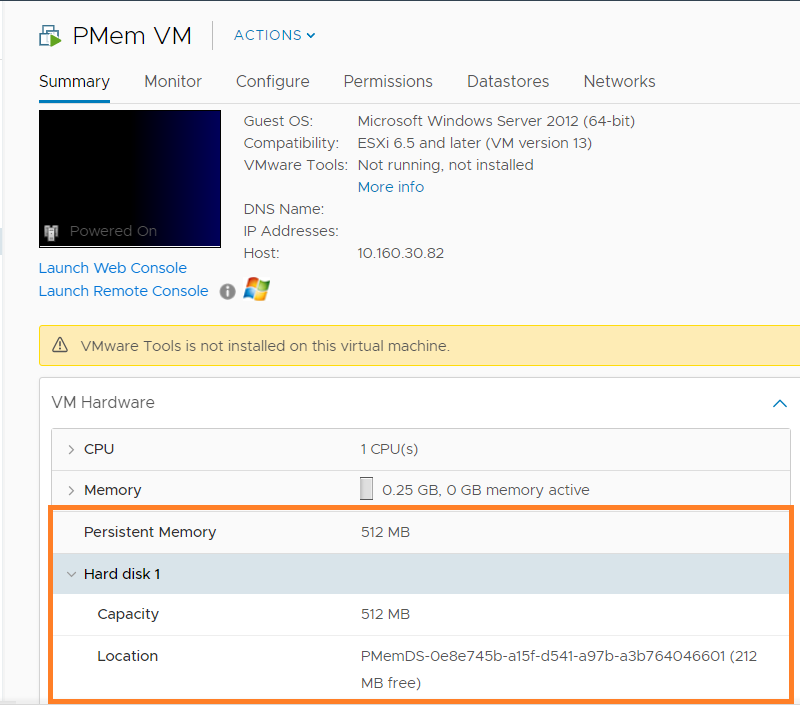
Now lets take a look at the VM summary.

ii) DRS initial placement
  • The VM I initially created got registered on one of the hosts with PMem storage and I observed that DRS places (once powered on) the VM on same host, where it was residing.
  • Then I created 2 PMem (same vmdk size) configured VMs and powered on. I see that DRS placed VMs on 2 separate hosts as expected.
iii) Host maintenance mode
  • I had 2 hosts with PMem and a host without PMem. I put one of the hosts with PMem into maintenance mode, where one of the PMem configured VMs was residing. I observed that DRS migrated the VM to another PMem host as expected.
  • Then I went ahead and put even 2nd host into maintenance mode. Since there is no any host with PMem by now, I observed 2nd host can not be put into maintenance mode.
iv) DRS Affinity rules
  • I played around both VM-VM and VM-host rules and I observed that DRS tries to satisfy rules but never migrates PMem configured VM to non PMem host even though rules gets violated.
v) DRS load balancing

I could not explore more on DRS load balancing with PMem VMs but what I have observed is that DRS prefers recommending non-PMem migrations more overs PMem VM migrations. If it is absolutely needed, only then DRS recommends PMem VM migration to other compatible hosts.

Notes on PMem
  • With vSphere 6.7, only one PMem local datastore is allowed per host.
  • Normal datastore operations are not available on PMem datastores and vSphere H5 client also does not list PMem datastores under regular datastore views. Only operation available is monitoring stats.
  • Monitor PMem datastore stats using ESXCLI 
  • Host-local PMem default storage policy can not be edited. Also, user can not change the PMem VM storage policy. In order to change, user either needs to migrate or clone that VM
  • PMem will be reserved no matter VM is powered on or not
  • Though PMem can be configured on standalone hosts. However, it is highly recommended to use DRS.
  • DPM (distributed power management) supports PMem as well.

Official documentation can be found  here & here

I hope you enjoyed this post. Please stay tuned for my another blog post on PMem, where I will discuss about creating PMem VMs using API.


Tutorial: Getting started with pyVmomi on Windows : Supports vSphere 6.7

Couple of months back, I wrote an article on “How did I get started with pyVmomi on ubuntu distro?”, which was very well received.  Recently I got several requests from readers  on how to set pyVmomi on Windows platform and I thought to write this tutorial, which will take you through steps required to set pyVmomi on my Windows 10.

Step 1: Install latest python for windows.

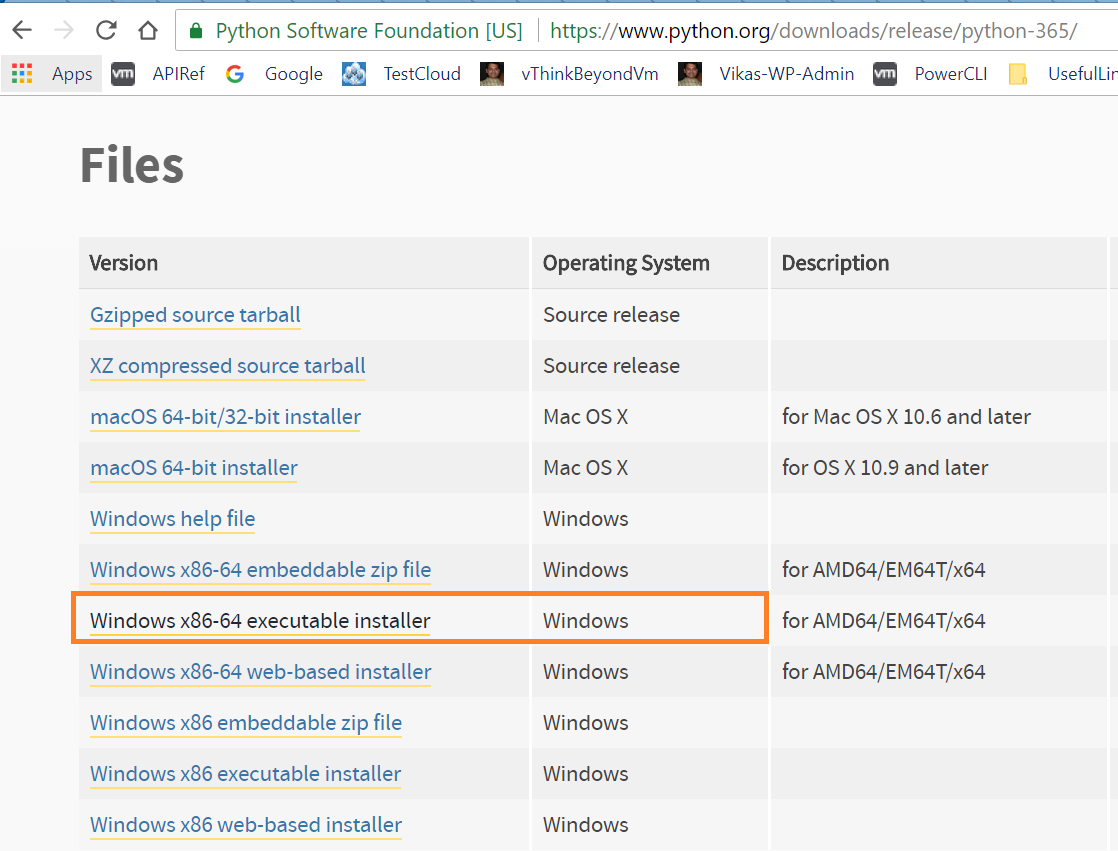
Latest 3.x python version available is 3.6.5 on python official portal . Download the python installer as pointed out in below screenshot.

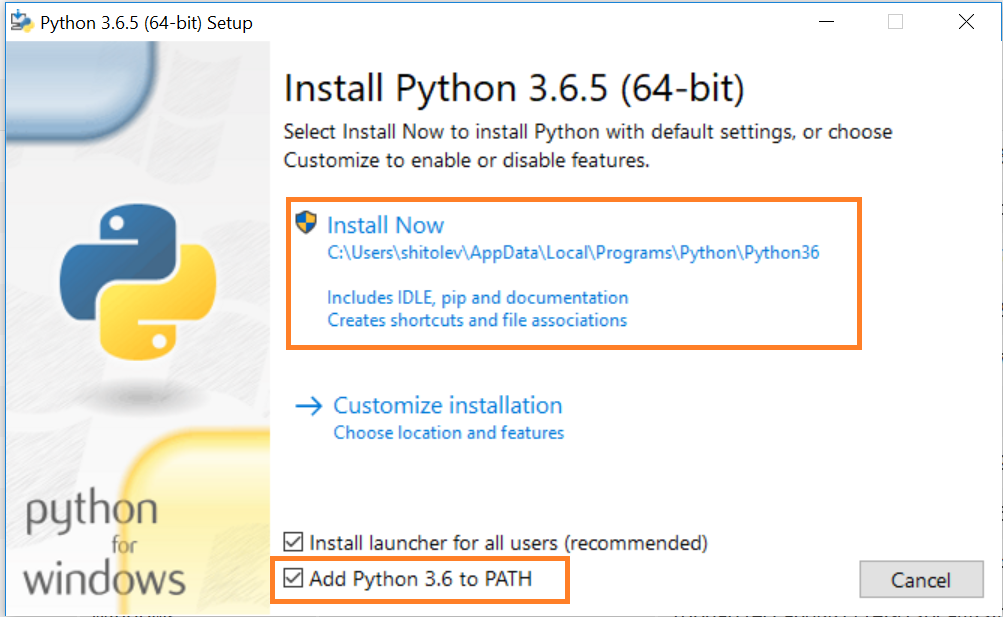
Once downloaded, while installing python, make sure to select checkbox “Add python 3.6 to PATH” as shown below.

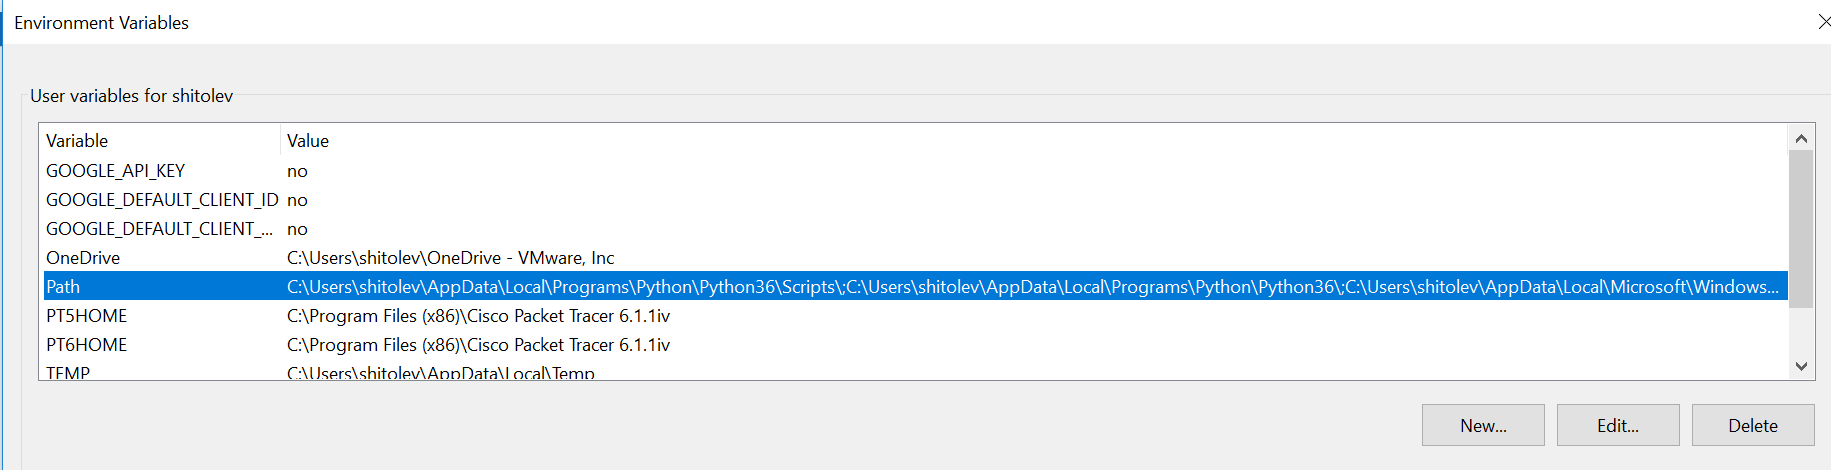
As soon as installation is completed, I checked environment variable and I see that python 3.6 path is set properly as shown below.

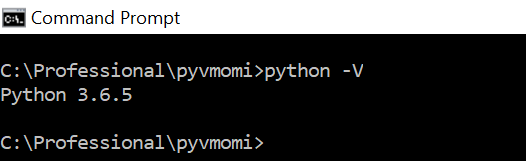
I see that python is installed as expected at directory i.e. C:\Users\shitolev\AppData\Local\Programs\Python\Python36, which is default directory. I also checked python version using “python -V” command and I see correct python version is installed.

Step 2: Install pyvmomi and pyvim python modules

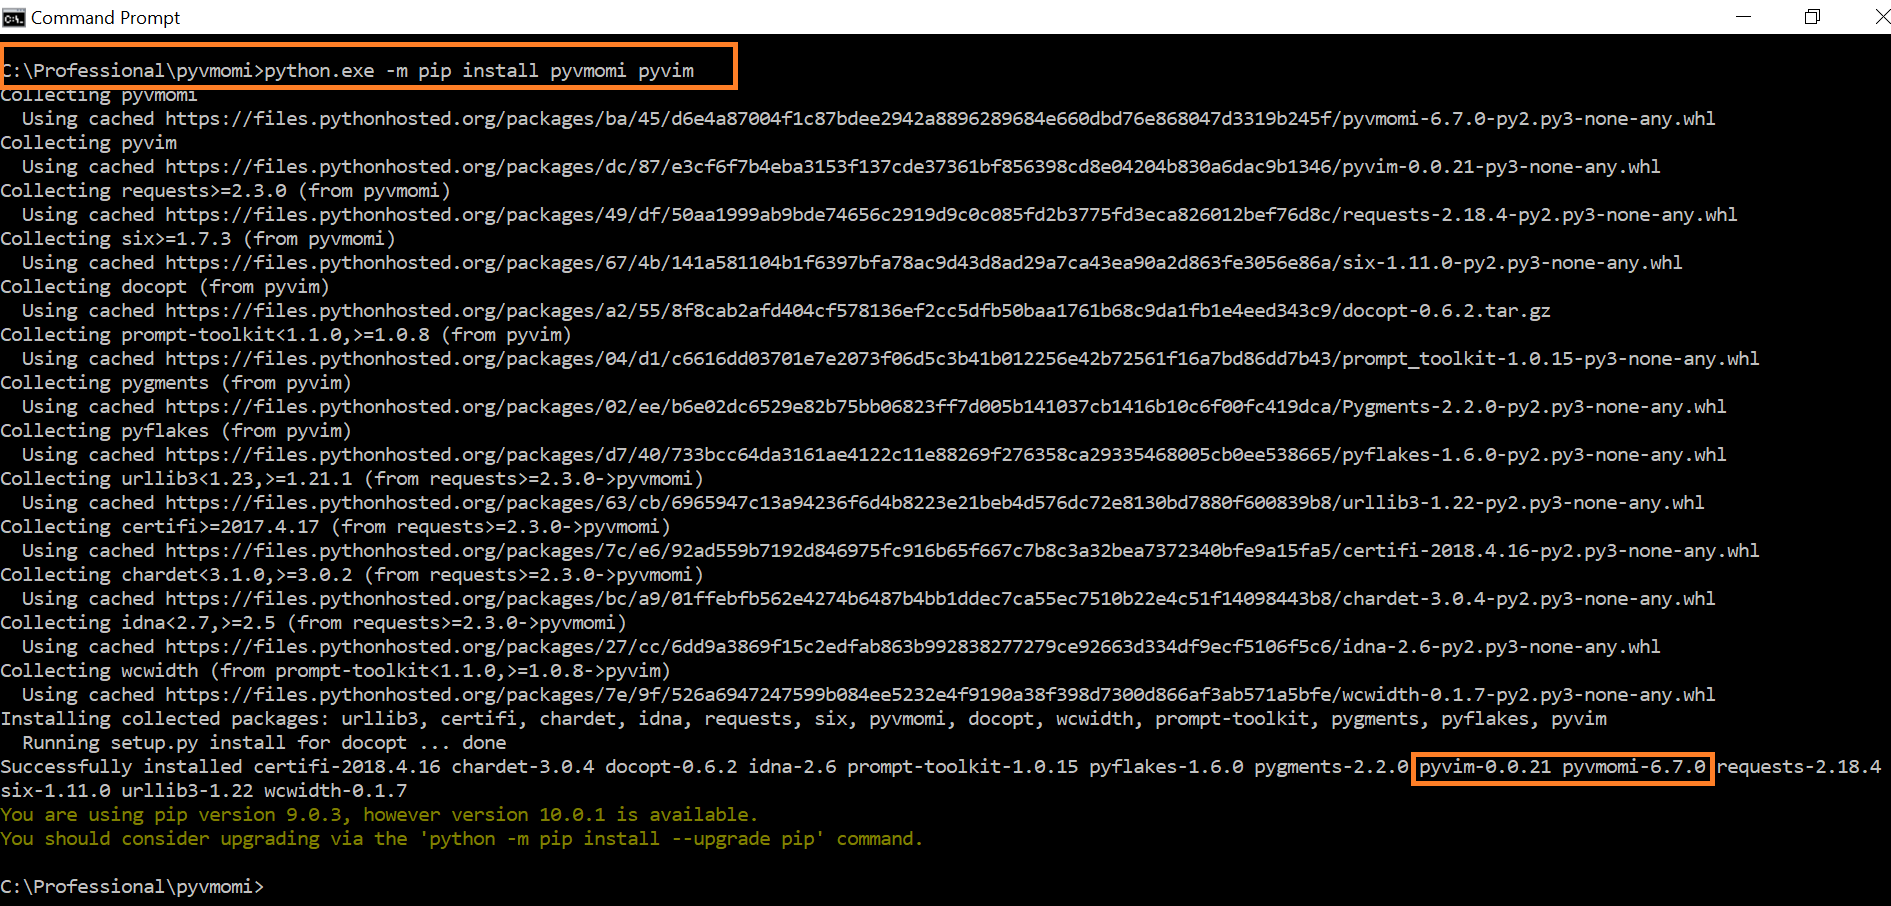
As I already discussed in my pyVmomi on ubuntu article, we need “pip” to install these python modules. Note that “pip” itself gets installed as part of python installation. Let us go ahead for “pyvmomi” and pyvim” modules installation by running this command
“python.exe -m pip install pyvmomi pyvim” . You can run this command from any directory of your choice.

Below is how it looks like

you can see that latest “pyvmomi” i.e. the one supports vSphere 6.7  and “pyvim” python modules got installed successfully. I also see that these modules are installed at python  directory i.e. C:\Users\shitolev\AppData\Local\Programs\Python\Python36\Lib\site-packages

Now that we are done with setting up pyVmomi on Windows, its time to run a vSphere API sample to confirm everything is working fine.

Step 3: Running vSphere API sample.

For the sake of simplicity I chose the same sample I used in my ubuntu article

[python]
# VMware vSphere Python SDK, pyvmomi
# Simple script to get vCenter server product details

from pyVim.connect import SmartConnect
import ssl

s=ssl.SSLContext(ssl.PROTOCOL_SSLv23) # For VC 6.5/6.0 s=ssl.SSLContext(ssl.PROTOCOL_TLSv1)
s.verify_mode=ssl.CERT_NONE

si= SmartConnect(host="10.192.1.2", user="Administrator@vsphere.local", pwd="VMware#123", sslContext=s)
aboutInfo=si.content.about

print ("Product Name:",aboutInfo.fullName)
print("Product Build:",aboutInfo.build)
print("Product Unique Id:",aboutInfo.instanceUuid)
print("Product Version:",aboutInfo.version)
print("Product Base OS:",aboutInfo.osType)
print("Product vendor:",aboutInfo.vendor)

[/python]

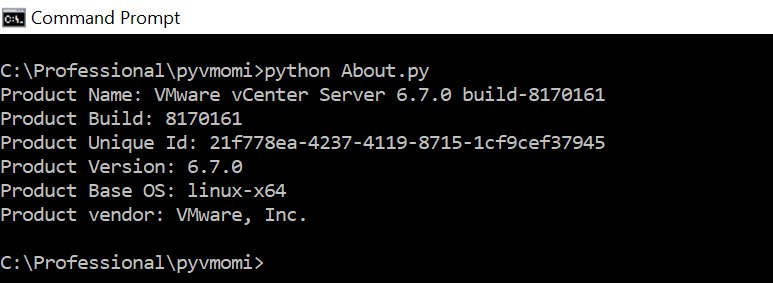
We can keep this sample file at any location of our choice and execute it as follows.

Output shows that this small pyvmomi script got executed on vSphere 6.7 successfully. How cool is that?

Note: I would like you to take a look at line #7, where I had to use “ssl.PROTOCOL_SSLv23” protocol for VC 6.7 connection. For VC 6.0 and 6.5, I used “ssl.PROTOCOL_TLSv1”.

Useful resources

1. Please take a look at tutorial on how to get hold of vSphere objects and play around. Take a look at some cool samples on VC HA

2. If you want to contribute to pyVmomi, refer pyvmomi and its samples github repo

3. Not interested in Python vSphere SDK? no problem, take a look at vSphere Java SDK and PowerCLI posts.

4. Getting started with vCenter server REST APIs using python

Tutorial: Part-2: How to simulate Proactive HA using pyVmomi?

In part-1, we learned “What is Proactive HA and how to configure Proactive HA using pyVmomi?”. To understand part-2, I highly recommend you to take a look at part-1. In this post, we will learn how to simulate a failure to see Proactive HA in action.

Before going further, let us review what we configured already in last post.
– We registered a health provider.
– Added entities to be monitored i.e. hosts inside cluster
– Verified above 2 steps.
– Enabled Proactive HA on cluster in automated mode and configured remediation.

After performing above steps, you might have observed that all of the hosts are showing one red icon. This red icon indicates that initial health status for hosts is unknown i.e. gray, which is absolutely expected since Proactive HA provider must initialize health status of all ESXi hosts for the first time. In order to initialize health status of all ESXi, first we need to set status to “green”. This is where Proactive HA API i.e. PostHealthUpdates() comes to rescue. In fact, the same API will help us simulate a “red” health status, which will make Proactive HA to take configured action. Let us take a look at below pyVmomi script, which will initialize ESXi hosts to “green” health status.

This script is available on my git-hub repo as well i.e. push_health_updates.py
[python]
from pyVim.connect import SmartConnect, Disconnect
from pyVmomi import vim
import atexit
import ssl
import sys
import time
#Script to push meaningful health updates to Proactive HA
s=ssl.SSLContext(ssl.PROTOCOL_TLSv1)
s.verify_mode=ssl.CERT_NONE
si= SmartConnect(host="10.161.20.30", user="Administrator@vsphere.local", pwd="VMware#123",sslContext=s)
content=si.content

# Below method helps us to get MOR of the object (vim type) that we passed.
def get_obj(content, vimtype, name):
obj = None
container = content.viewManager.CreateContainerView(content.rootFolder, vimtype, True)
for c in container.view:
if name:
if c.name == name:
obj = c
break

return obj

#Cluster where ProactiveHA is enabled, this parameter is NOT required for this script
cluster_name="ClusterProHA"
# initialize health status of below host, we need to repeat for all the hosts inside the cluster.
host_name="10.160.20.15"
host = get_obj(content,[vim.HostSystem],host_name)
# Managed object that exposes all the methods to configure & manage proactiveHA
heath_update_mgr=content.healthUpdateManager

#Provider ID for the registered provider
providerid="52 b5 17 d2 2f 46 7e 9b-5f 4e 1a 25 a3 db 49 85"
health_update=vim.HealthUpdate()
health_update.entity=host
health_update.healthUpdateInfoId="1000"
health_update.id="vThinkBeyondVM"
health_update.remediation =""
health_update.status="green"
#Below is the array of health updates
updates = [health_update]

#Method to post health updates for Proactive HA to consume
heath_update_mgr.PostHealthUpdates(providerid,updates)

#Disconnecting vCenter session
atexit.register(Disconnect, si)

[/python]

We must understand line #32 to line #45.
Line #34: This is provider id for the health provider we registered in part 1 using QueryProviderName() API
Line #35: HealthUpdate is the data object to be passed to the Proactive HA API we are talking about i.e. PostHealthUpdates()
Line #36: This is the host object for which we wanted to set status to “green”. For the sake of simplicity, this script changes health status per host. You can either modify this script to have for all the hosts or can run it multiple times.
Line #37: This is the healthUpdateInfoId we passed while registering health provider i.e. register_provider.py
Line #38: This id can be any of our choice but it should be unique per health update being pushed.
Line #39: Note that remediation set here was blank. This is required when we are setting health updates as “green”.
Line #40: Here we set the health status as “green”. Other valid values are “yellow” and “red”.
Line #42: We can have multiple health updates in single API call.
Line #45: This is the API we are interested to call i.e. PostHealthUpdates().

Since we have initialized health status for all ESXi hosts to “green”, now is the time to simulate a fake health update so that Proactive HA will trigger “quarantine mode” on a host. We can use exactly the same script with little change to line #38,39 & 40. Note that simulating fake health update is only for educational purpose . Take a look at the code snippet for pushing “red”(fake) health status a host.

[python]
#Provider ID for the registered provider
providerid="52 b5 17 d2 2f 46 7e 9b-5f 4e 1a 25 a3 db 49 85"
health_update=vim.HealthUpdate()
health_update.entity=host
health_update.healthUpdateInfoId="1000"
health_update.id="vThink-BVM"
health_update.remediation ="Please replace power unit"
health_update.status="red"
#Below is the array of health updates
updates = [health_update]

#Method to post health updates for Proactive HA to consume
heath_update_mgr.PostHealthUpdates(providerid,updates)

[/python]

Once I executed above script, I refreshed web client after 3-4 seconds and below is what I see. How cool is that?

Now you can set the host health status back to “green” the way did above, which will make host to exit from quarantine mode. Finally you can leverage my Part-1 scripts to disable Proactive HA on the cluster and un-register the fake health provider we registered initially. In addition to APIs we explored in part-1 & 2, there are few more utility APIs Proactive HA has exposed. I will leave them for your exercise. Let me know if you have any doubts/comments.

Further learning:

1. If you haven’t started with vSphere python SDK i.e. pyVmomi. Here is my tutorial post on the same.

2.For the sake of simplicity, I use to write individual API scripts & hard-code some parameters but I have a plan to consolidate above scripts to have good Proactive HA pyVmomi module. If you would like to contribute to module, please let me know, we can work together.

pyVmomi script: How to confirm ESXi hypervisor & microcode patches are applied?: Spectre vulnerability

Some time back, VMware has updated one of KBs on “Hypervisor-Assisted Guest Mitigation for branch target injection”. Please take a look at this KB here. In this KB, there is one important section on “how to confirm a host has both patched microcode and patched VMware hypervisor?” In fact, there are multiple ways to confirm it and one of the ways is specified in the KB itself i.e. scanning VM vmware.log file for new cpuids. Last time, I had automated exactly the same way using PowerCLI.  Since there is a very handy host level vSphere API property available to confirm these patches, I thought to write a quick pyVmomi script. This will be very handy for people who prefer pyVmomi. Also as it uses native vSphere APIs, it will be faster than its PowerCLI equivalent.

This script i.e. hosts_patched.py available on my git repo as well.

[python]
from pyVim.connect import SmartConnect, Disconnect
from pyVmomi import vim
import atexit
import ssl
import sys
import argparse
import getpass

# Script to confirm whether EVC cluster is patched or not for Spectre vulenerability.

def get_args():
""" Get arguments from CLI """
parser = argparse.ArgumentParser(
description=’Arguments for talking to vCenter’)

parser.add_argument(‘-s’, ‘–host’,
required=True,
action=’store’,
help=’vSpehre service to connect to’)

parser.add_argument(‘-o’, ‘–port’,
type=int,
default=443,
action=’store’,
help=’Port to connect on’)

parser.add_argument(‘-u’, ‘–user’,
required=True,
action=’store’,
help=’Username to use’)

parser.add_argument(‘-p’, ‘–password’,
required=False,
action=’store’,
help=’Password to use’)

parser.add_argument(‘-c’, ‘–cluster’,
required=True,
action=’store’,
default=None,
help=’Name of the cluster you wish to check’)

args = parser.parse_args()

if not args.password:
args.password = getpass.getpass(
prompt=’Enter vCenter password:’)

return args

# Below method helps us to get MOR of the object (vim type) that we passed.
def get_obj(content, vimtype, name):
obj = None
container = content.viewManager.CreateContainerView(content.rootFolder, vimtype, True)
for c in container.view:
if name and c.name == name:
obj = c
break
container.Destroy()
return obj

args = get_args()
s=ssl.SSLContext(ssl.PROTOCOL_TLSv1)
s.verify_mode=ssl.CERT_NONE
si= SmartConnect(host=args.host, user=args.user, pwd=args.password,sslContext=s)
content=si.content
cluster_name=args.cluster

#Cluster object
cluster = get_obj(content,[vim.ClusterComputeResource],cluster_name)
if(not cluster):
print ("Cluster not found, please enter correct EVC cluster name")
quit()

print ("Cluster Name:"+cluster.name)

# Get all the hosts available inside cluster
hosts = cluster.host

#Iterate through each host to get MaxEVC mode supported on the host
for host in hosts:
print ("———————————-")
print ("Host:"+host.name)
feature_capabilities = host.config.featureCapability
flag=False
for capability in feature_capabilities:
if(capability.key in ["cpuid.STIBP", "cpuid.IBPB","cpuid.IBRS"] and capability.value=="1"):
print ("Found::"+capability.key)
flag=True
if(not flag):
print ("No new cpubit found, hence "+host.name+" is NOT patched")
else:
print ("New CPU bit is found, hence "+host.name+" is patched")

atexit.register(Disconnect, si)

[/python]

This script takes VCIP, username, password and cluster-name (with or without EVC) as parameter. Let us take a look at below output.

Output:
vmware@localhost:~$ python hosts_patched.py -s 10.192.30.40 -u Administrator@vsphere.local -c EVCCluster
Enter vCenter password:
Cluster Name:EVCCluster
———————————-
Host: 10.20.43.35
Found ::cpuid.IBPB
Found ::cpuid.IBRS
Found ::cpuid.STIBP
New CPU bit is found, hence 10.20.43.35 is patched
———————————-
Host:10.20.43.36
No new cpubit found, hence 10.20.43.36 is NOT patched
vmware@localhost:~$

Based on above script, it is clear that there are 2 hosts inside the cluster and only one of them has exposed new cpuids, that confirms it is patched with both ESXi hypervisor & microcode.

Further learning:

1. I highly recommend you take a look at last post on EVC cluster.
2. Empty EVC cluster issue discussed here is fixed with latest vCenter Patches
3. My PowerCLI script to achieve the same
4. Tutorial on getting started pyVmomi

I hope you enjoyed this post, let me know if you have any questions/doubts.